
How to Set Up a New Aquarium A Practical Guide
Setting up a new aquarium isn't just about plugging things in. You've got to plan the setup, get the gear assembled, figure out your aquascape, and then—the hard part—patiently wait for the tank to cycle. This takes about 4-8 weeks before you can even think about adding fish or corals. This whole process is non-negotiable; it builds the biological foundation your tiny ocean needs to actually survive and thrive.
Starting Your Saltwater Reef Tank Journey
Let's be honest, getting into a saltwater reef tank is a huge thrill. It's easy to get lost daydreaming about pulsing Xenia and a pair of clownfish darting through an anemone. But the reefers who succeed long-term don't start by buying equipment; they start with the right mindset. You're not just putting together a glass box; you're becoming the caretaker of a living, breathing ecosystem in miniature.
Getting your head around that is the real first step. A simple freshwater tank might forgive a few rookie mistakes, but a reef tank is a delicate dance of chemistry, biology, and a whole lot of patience. That initial excitement usually comes with a healthy dose of anxiety, too. Am I buying the right light? Are my fish going to make it? Totally normal. The goal here is to trade that anxiety for a clear, confident plan.
Embracing the Process
The most important piece of "equipment" you'll ever own in this hobby isn't the fanciest light or the beefiest protein skimmer. It's patience. The single biggest mistake I see new hobbyists make is rushing the initial setup and cycling. They get impatient, add things too quickly, and end up with a mess of algae, dead livestock, and a ton of frustration. A reef tank doesn't look good in a week; it matures over months and even years.
A thriving reef aquarium is a marathon, not a sprint. Every decision made during the initial setup echoes for years to come, making thoughtful planning your most powerful tool for long-term success.
Think of yourself as a gardener, not an owner. You're cultivating a dynamic environment where everything from invisible bacteria to your prized corals and fish all depend on the stability you create. Shifting your perspective like this helps you prioritize the health of the system over the instant gratification of adding another coral.
Planning for a Living Ecosystem
Before you pull out your credit card for that dream tank, think about the real commitment. A successful reef demands consistent attention and a genuine desire to keep learning. It's not a piece of furniture you can ignore for a few weeks. This guide will walk you through the practical stuff, but your success really boils down to your commitment to the process. Here’s what you’re signing up for:
- Daily Observation: Just a quick peek at your tank every day. You'll start to notice little things—is a snail upside down? Is that coral's color a little off? Catching things early is huge.
- Weekly Maintenance: This is your routine. Testing the water, scraping the glass, and doing a partial water change are the usual suspects here.
- Continuous Learning: The hobby is always changing. New techniques, new gear, and a better understanding of marine biology are always coming out. You've got to be willing to keep learning.
By getting ready for the journey, you're not just building an aquarium. You're setting the stage for a jaw-dropping slice of the ocean in your own home. So let’s get you confident and build a clear vision for the thriving reef you're dreaming of.
Choosing Your Aquarium and Essential Gear
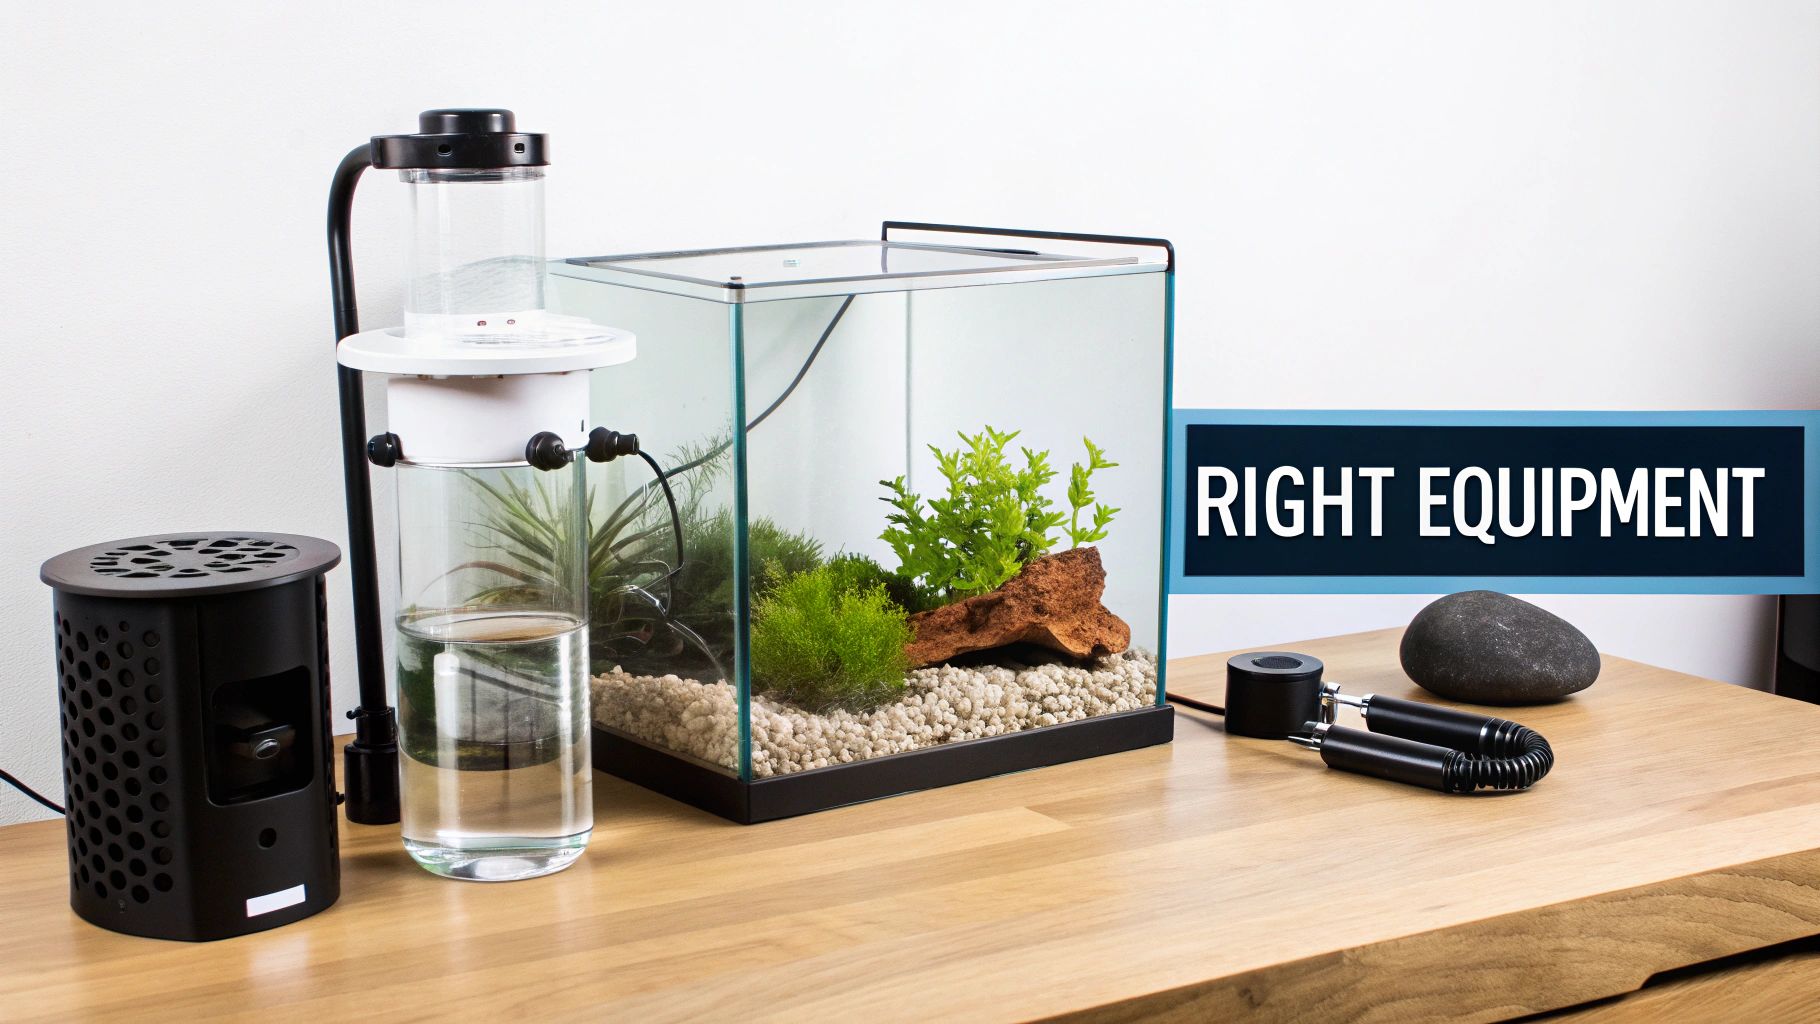
Alright, let's get to the fun part. Kicking off a new reef tank starts with two huge decisions: the aquarium itself and the life support gear that will keep everything inside it thriving.
These early choices are a big deal. They set the stage for your budget, what kinds of corals and fish you can keep, and how much time you'll spend on maintenance each week. Trust me, getting this right from the beginning will save you a world of headaches and money down the road.
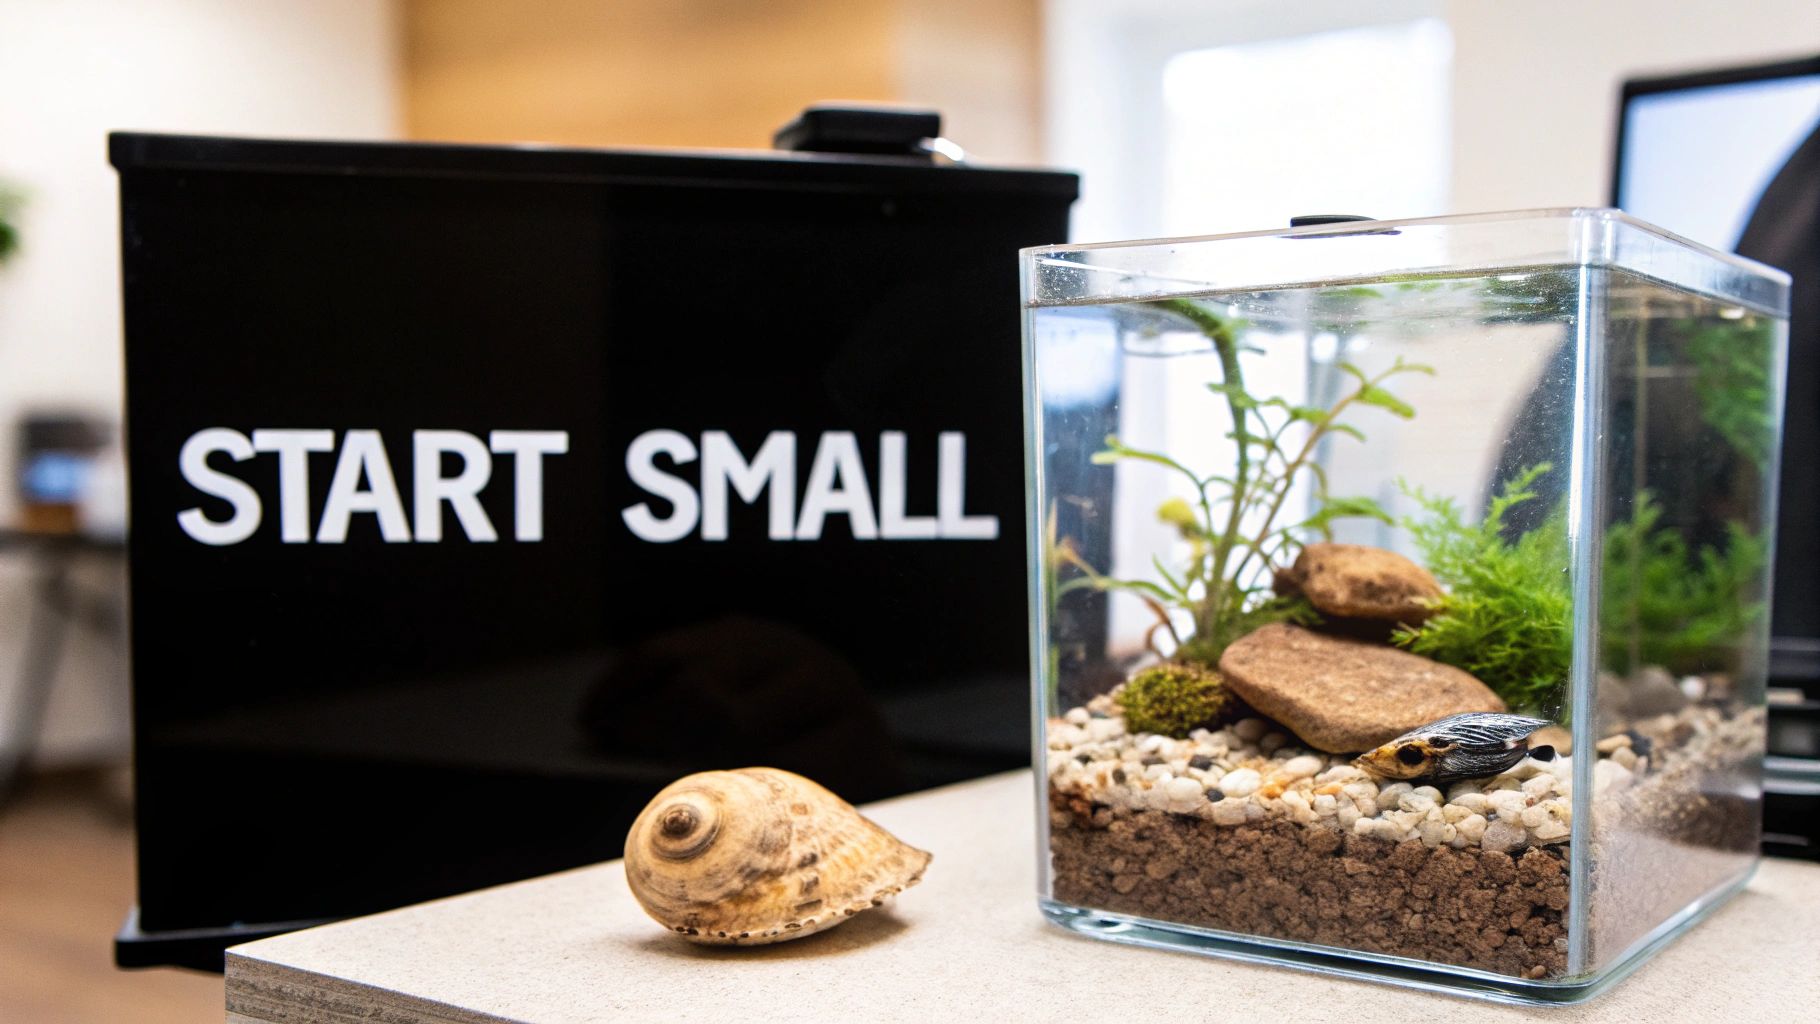
The common rookie mistake? Starting small. It's tempting to grab a "nano" tank—anything under 30 gallons—because they seem less intimidating and fit just about anywhere. The problem is, their small water volume makes them incredibly unstable. One tiny slip-up in a nano tank can spiral into a full-blown disaster because temperature and water chemistry can swing wildly in a matter of hours.
On the other hand, larger tanks—think 40 gallons or more—are far more forgiving. The greater water volume acts as a buffer, diluting toxins and resisting those sudden parameter shifts that can wipe out a tank. If you have the space and the budget, a bigger tank is almost always the smarter move for your first reefing adventure.
Picking the Right Tank Size for You
Choosing the perfect tank size is about more than just finding a spot in your living room. It's a balancing act between your long-term goals, your wallet, and how much time you can realistically commit. A big display tank looks incredible, but a smaller one might demand more of your attention.
Your tank is a serious piece of your initial investment. This isn't just a hobbyist trend; the global aquarium market is set to hit USD 5 billion by 2025 and is projected to grow at a 7% CAGR through 2033. That growth is fueled by people like us building incredible home ecosystems, which just goes to show how important it is to make a smart choice on your first big purchase.
- Nano Reefs (Under 30 Gallons): Perfect for tight spaces. But be warned: they demand constant, meticulous water testing and changes to keep things stable. These are best left to seasoned hobbyists or newcomers who are ready for a very strict maintenance routine.
- Mid-Size Tanks (40-75 Gallons): This is the sweet spot for most beginners. They offer enough stability to forgive common mistakes while still being manageable in terms of cost and physical footprint. You get a ton of flexibility for stocking fish and corals.
- Large Displays (100+ Gallons): These tanks offer maximum stability and let you keep larger, more active fish. The catch? The initial gear cost is significantly higher, and routine jobs like water changes become a much bigger physical task.
The name of the game is stability. While a 10-gallon nano on your desk looks cool, a 40-gallon breeder tank gives you a much wider margin for error. That makes the entire learning curve a whole lot less stressful.
Assembling Your Life Support System
Once you've landed on a tank, it's time to build its engine. This is the equipment that will keep everything inside alive and well. When it comes to a successful reef, you absolutely cannot skimp on three things: filtration, lighting, and water movement.
Good filtration is the backbone of great water quality. It's not just about making the water look clear; it's about processing invisible waste like ammonia, which is lethal to your fish and corals. A solid filtration plan usually involves a few key pieces of gear working in concert. For a deep dive into the nitty-gritty, check out our guide on water quality and filtration at https://www.getpoddrop.com/blog/categories/water-quality-filtration.
Here’s a quick look at the essential gear you'll need for a typical 40-gallon setup, with a breakdown of what you can expect to spend.
Essential Reef Tank Equipment Breakdown
| Equipment Component | Primary Function | Beginner Budget Range | Advanced Setup Range |
|---|---|---|---|
| Lighting (LED) | Provides energy for coral photosynthesis (PAR) and color | $150 - $300 | $400 - $800+ |
| Protein Skimmer | Removes organic waste before it breaks down into nitrates | $100 - $200 | $250 - $500 |
| Heater | Maintains a stable water temperature (typically 78°F) | $30 - $60 | $70 - $150 |
| Wavemaker/Pump | Creates water flow for oxygen exchange and coral health | $50 - $100 | $200 - $400+ |
| RO/DI Unit | Purifies tap water to remove harmful contaminants | $150 - $250 | $250 - $400 |
Choosing the right equipment isn't about grabbing the priciest option off the shelf. It’s about understanding why each piece matters. For instance, a high-powered LED light is non-negotiable if you dream of keeping light-hungry SPS corals, but it's probably overkill for a simple fish-only tank.
Likewise, a protein skimmer is your single best defense against nutrient buildup, yanking waste out of the water before it can turn into algae fuel. Investing wisely here doesn't just set you up for success—it saves you from frustrating problems and expensive upgrades later on.
Building Your Aquascape and Preparing Water
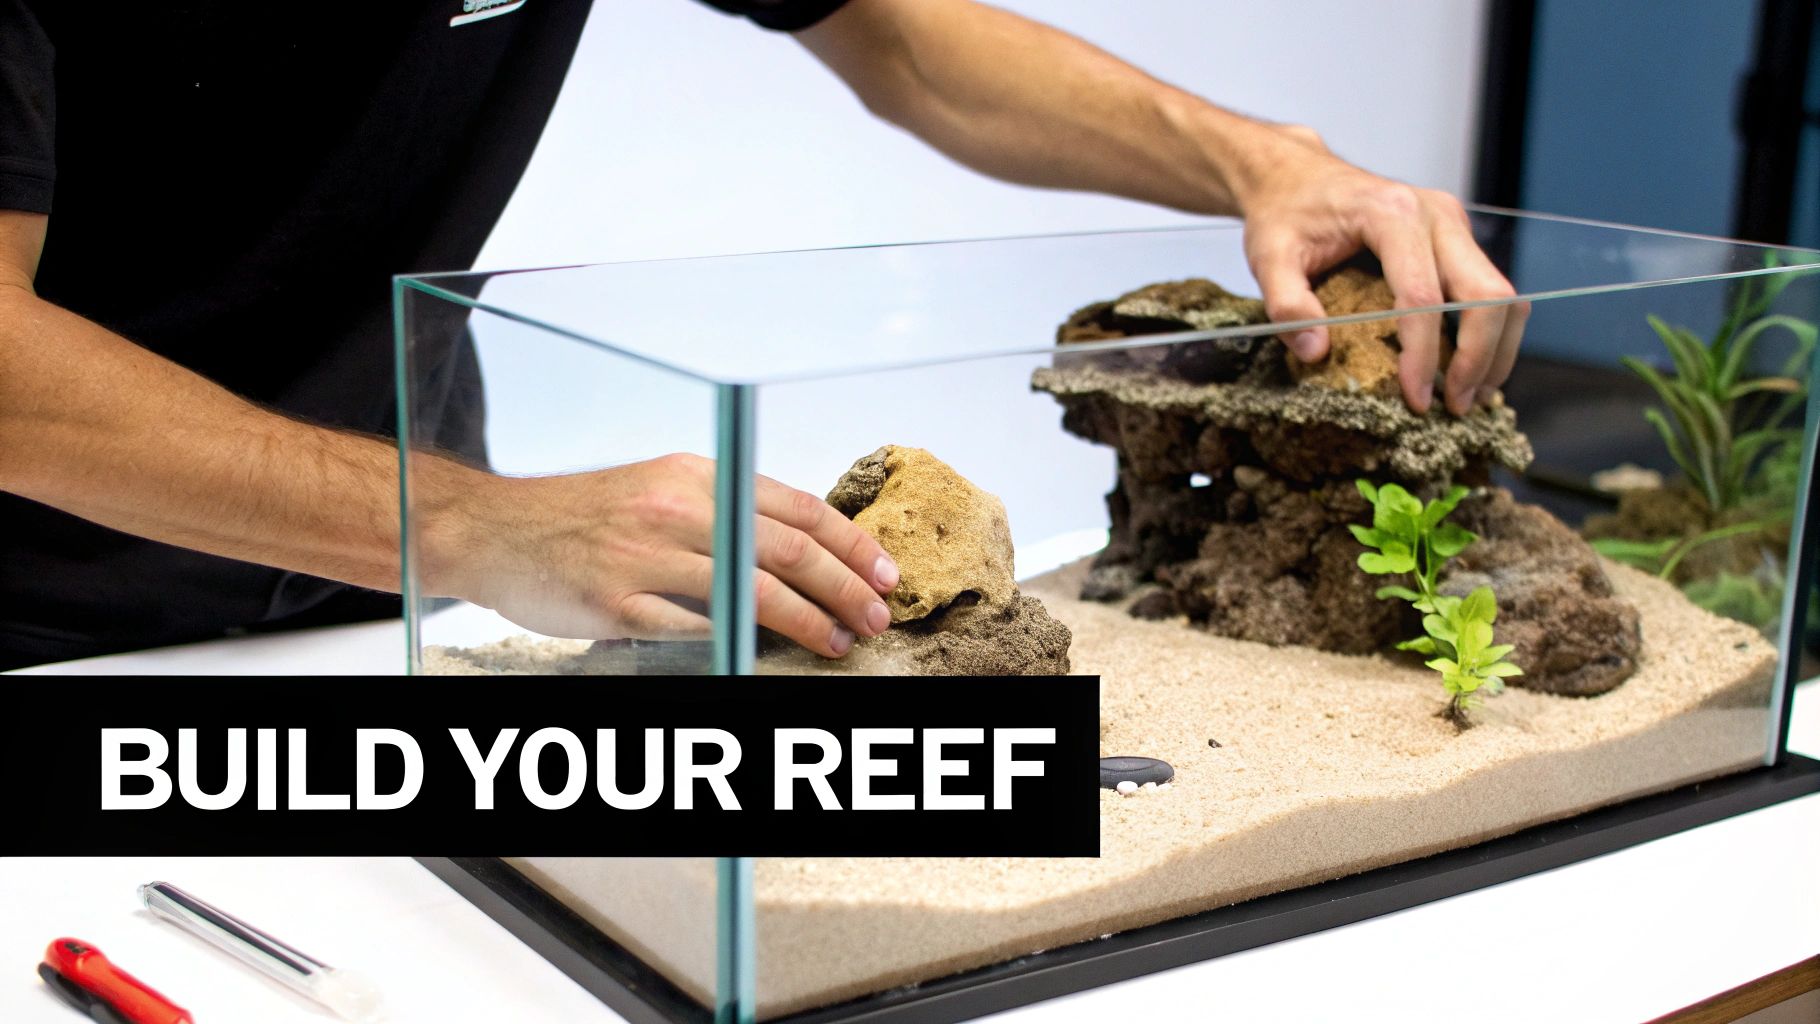
With your tank and all the gear finally in place, the fun part begins: bringing your vision to life. This is where you get your hands wet—metaphorically, for now—and create the physical structure of your reef. We call this the aquascape.
But don't be fooled. Your rockwork and sand bed are far more than just decorations. They form the literal bedrock of your biological filter, providing a home for beneficial bacteria and endless territory for your future fish and corals to explore.
Think of yourself as an underwater architect. You're not just piling up rocks; you're building caves for a reclusive goby, ledges for corals to perch on, and open channels that keep the water flowing smoothly. A great aquascape is the perfect marriage of form and function.
The look of a reef tank is a huge part of the appeal, and it's a big business. The global aquarium décor market was pegged at USD 1.5 billion in 2025 and is projected to climb by 8.5% a year through 2033. It just goes to show how much we all value creating a slice of the ocean in our homes. You can dig into the aquascaping market trends and their growth if you're curious.
Choosing Your Rock and Sand
Your first big decision in building the aquascape is your choice of rock. This single choice has a massive impact on your tank's biology, how long it takes to get started, and your budget. You've got three main roads to go down.
- Live Rock: This is the real deal, harvested straight from the ocean. It comes "live" because it's already covered in the good stuff—beneficial bacteria, coralline algae, and tons of other microscopic life. It's the fastest way to cycle a tank, but it's a bit of a gamble. You can easily introduce pests like Aiptasia anemones or stubborn nuisance algae.
- Dry Rock: This is natural ocean rock that has been completely dried out, making it sterile. It’s totally pest-free and usually easier on the wallet. The trade-off? It takes much longer to "seed" and become biologically active. For many reefers who want a clean slate, this is the go-to choice.
- Man-Made Rock: Companies like CaribSea or MarcoRocks make artificial rock that looks and feels like the real thing. It’s an awesome option because it's environmentally friendly, 100% pest-free, and gives you complete control over your tank's biology from day one.
For the sand, you can't go wrong with a fine to medium-grain aragonite sand. It’s the standard for a reason. It hosts beneficial bacteria and gives burrowing critters a natural place to live. Aim for a sand bed depth of about 1 to 1.5 inches. That’s deep enough to look good but shallow enough to keep nasty anaerobic pockets from forming.
Here's a pro tip: Before you even think about putting rocks in the tank, do a dry run. Grab a piece of cardboard cut to the size of your tank's base and play around with the rock layout. This lets you get creative without scratching the glass or trying to maneuver in a tight space.
Crafting a Stable and Functional Aquascape
Once you've got your rock, the goal is to create a structure that's both stable and stunning. A rock slide is a reefer's nightmare—it can crack the tank or crush expensive livestock. Security is everything. Use an aquarium-safe epoxy or super glue to lock key pieces together. You want it to be solid enough to withstand a bump or the digging of an industrious goby.
As you build, think about creating "negative space." Open structures with arches, caves, and overhangs look way more natural. More importantly, they promote excellent water circulation, which is critical for preventing detritus from settling in dead spots. This open concept also gives your fish plenty of places to hide, which makes for happier, less-stressed inhabitants.
With your rockwork set, it’s sand time. Never dump dry sand directly into your tank—you'll create a cloudy mess that can take days to clear. Rinse it first. Put the sand in a bucket and run RO/DI water through it until the water comes out clear. Then, you can carefully place the damp sand on the bottom, arranging it around your rocks.
Mixing Saltwater and Leak Testing
Hardscape is done. It's finally time to add water! But not just any water. You must use Reverse Osmosis Deionized (RO/DI) water mixed with a high-quality marine salt mix.
Follow the directions on your salt mix package to the letter. Use a clean, food-grade bucket or brute can. A small powerhead and a heater in your mixing container will speed up the process and get the water to your target temperature, which is usually around 78°F. Use a refractometer to dial in your specific gravity to 1.025-1.026.
Once it's mixed and stable, you can start filling the tank. Pour the water slowly onto a plate or a piece of plastic sitting on the sand bed to avoid making a mess. Fill it all the way up, turn on your pumps, and let the system run for at least 24-48 hours. This is your leak test. Check every single fitting, seam, and piece of plumbing for drips. Finding a tiny leak now is a minor fix; finding one after you've added livestock is a full-blown disaster.
Cycling Your Tank and Establishing a Food Web
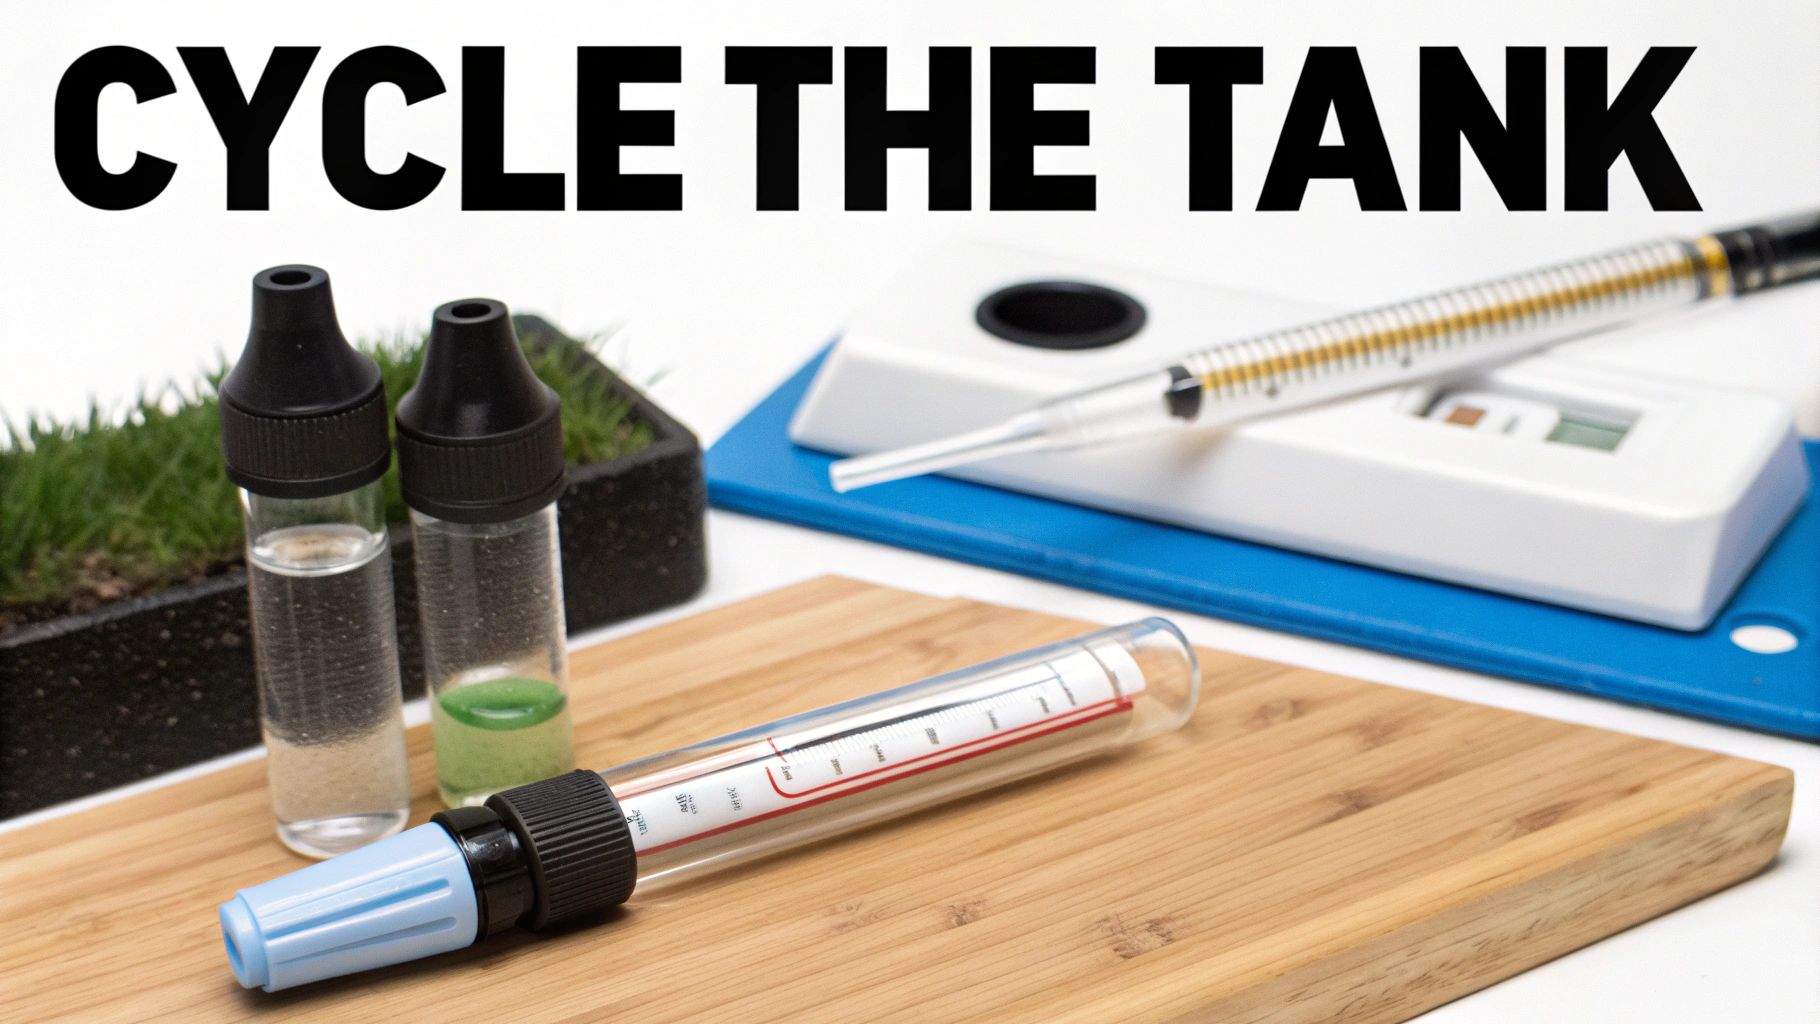
So, your aquascape is set, the water is perfectly clear, and all the gear is humming along nicely. It might look like a finished aquarium, but from a biological standpoint, it's a completely blank slate. This is where the real magic—and the most critical phase for any new tank—begins: the nitrogen cycle.
Think of this invisible process as the living engine that will power your entire reef. It's how nature breaks down toxic waste into something far less harmful, all thanks to colonies of beneficial bacteria. Trying to rush this part is probably the single biggest mistake new hobbyists make. Patience is non-negotiable here.
Understanding the Nitrogen Cycle
In the simplest terms, everything that decays in your tank, from fish waste to a bit of uneaten food, produces highly toxic ammonia. A specific group of beneficial bacteria will eventually grow and consume this ammonia, converting it into nitrite—which, unfortunately, is also extremely toxic to fish and corals.
Then, a second type of bacteria gets to work, consuming that nitrite and turning it into nitrate. While high nitrate levels can cause their own problems, like fueling nuisance algae, nitrate is vastly less harmful than its predecessors. This entire biological ramp-up usually takes anywhere from four to eight weeks.
The cycle is officially complete only when your test kits show zero ammonia and zero nitrite, with a measurable amount of nitrate present. Until you hit this milestone, your aquarium is not safe for fish or corals.
To get this whole process started, you need an ammonia source to "feed" the bacteria you want to grow. There are a few tried-and-true methods.
- Ghost Feeding: Just add a tiny pinch of fish food to the tank every other day, as if you were feeding fish that don't exist yet. As it breaks down, it will release ammonia.
- Pure Ammonia: For more precise control, you can dose pure, unscented ammonia (like Dr. Tim's Aquatics Ammonium Chloride). This lets you aim for a specific starting level, usually around 2 parts per million (ppm).
- A Piece of Shrimp: The old-school method of dropping a small piece of raw shrimp from the grocery store into the tank still works great. As it decomposes, it provides a slow, steady ammonia source.
No matter which path you take, you'll need reliable test kits for ammonia, nitrite, and nitrate to see what's happening. This isn't a "set it and forget it" step; you have to actively monitor the chemistry to know where you are in the process.
Seeding Your Reef with Life
While the nitrogen cycle deals with the invisible toxins, a truly mature and stable reef tank also needs a thriving microscopic food web. This is where copepods and phytoplankton enter the picture. These tiny crustaceans and microalgae are the absolute foundation of the ocean's food chain.
By adding them to your tank during or right after the cycle, you establish a robust population of microfauna from the get-go. This isn't just a nice little bonus; it's a fundamental step in creating a balanced, living ecosystem. This tiny cleanup crew will constantly graze on detritus and nuisance algae, helping keep your tank cleaner and more stable in the long run.
The perfect time to add live copepods and phytoplankton, like those found in a PodDrop Live Reef Nutrition blend, is when your ammonia and nitrite levels have peaked and are on their way down. The harshest chemical swings are over by then, giving these tiny critters a much better shot at establishing a healthy, breeding population.
Once you add them, they'll make a home in your rockwork and sand bed, creating a self-sustaining food source. This becomes absolutely essential if you ever want to keep some of the more fascinating—but notoriously picky—eaters in the hobby.
Fish That Depend on a Healthy Pod Population:
1. Mandarin Dragonets: Famous for their psychedelic patterns, these fish eat copepods almost exclusively and will starve in a tank without a massive, well-established population.
2. Scooter Blennies: Much like mandarins, these quirky fish are constantly hunting for pods on the rocks and sand.
3. Pipefish: Delicate and unique, these fish need a constant supply of small, live foods to thrive.
4. Certain Wrasses: Many wrasse species, particularly when they're young, spend their days hunting for pods to supplement their diet.
By seeding your tank early, you’re doing more than just preparing for future fish. You're building a more resilient, self-sufficient system from the ground up. This proactive approach helps your tank mature faster and can head off many common "new tank" problems before they even start. If you want to dive deeper, you can learn all about the intricate dynamics of the reef food chain in our detailed guide. Taking this step is what transforms your sterile glass box into a genuine, living ecosystem ready to support vibrant life.
Adding Your First Inhabitants The Smart Way
After weeks of patiently testing and watching your tank cycle, the moment you've been waiting for is finally here. Your nitrogen cycle is complete, the parameters look stable, and it's time to bring some life into your new ecosystem. This is hands-down the most exciting part of the journey, but it's also where a little impatience can undo all your hard work.
It’s tempting to rush out and buy that stunning tang or delicate coral you’ve been dreaming of, but that's a classic recipe for disaster. A newly cycled tank is stable, but it's far from mature. Its biological filter is established, but it can be overwhelmed in a heartbeat. The real key to long-term success is to start slow and add new life methodically, letting your little ecosystem adapt and grow stronger with each new arrival.
Start with the Clean-Up Crew
Believe it or not, your very first additions shouldn't be fish or corals. They should be a humble and hardworking "clean-up crew," or CUC. This team of snails, crabs, and other invertebrates will become the janitors of your reef, constantly grazing on the inevitable algae blooms that pop up in every new system. They're the perfect first test of your tank's stability.
Introducing a small CUC first gives your biological filter a chance to adjust to a very small increase in bioload. More importantly, they get to work immediately on the diatoms and other films that appear as you start running your lights. It’s a proactive approach that helps keep your rockwork and sand bed looking pristine from day one.
A well-balanced starter CUC for a 40-gallon tank might look something like this:
* 5-10 Astrea Snails: Fantastic cleaners for your glass and rock surfaces.
* 5-10 Nassarius Snails: These guys are sand-sifting machines, burrowing to keep it stirred and eating leftover food.
* 2-3 Scarlet Reef Hermit Crabs: Peaceful and highly effective algae grazers.
* 1 Emerald Crab: A great specialist for tackling tougher algae like bubble algae if it appears.
Selecting Your First Fish
Once your CUC has been cruising around for a week or two and your water parameters haven't budged, it’s time for your first fish. The ornamental aquarium fish market is a massive industry, valued at around USD 7.1 billion in 2023 and still growing. This reflects the incredible diversity available to us as hobbyists, but for your very first fish, resilience is everything.
You need to choose a species that is hardy, peaceful, and relatively small—something that can forgive the subtle fluctuations of a young tank. Clownfish are an iconic choice for a reason; they're almost all captive-bred, tough as nails, and adapt beautifully to aquarium life. For a deeper dive into some great options, check out our guide to starter fish for saltwater tanks.
Quarantine isn't just a suggestion; it's the single most important habit in responsible reefkeeping. A simple, separate quarantine tank (QT) lets you observe new fish for illness for 4-6 weeks before they ever touch your display tank. Skipping this step is like playing Russian roulette with the health of your entire system.
The Art of Proper Acclimation
Bringing a new fish home is incredibly stressful for the animal. It has already been through capture, shipping, and multiple water changes. Your job is to make this final transition into its permanent home as smooth as possible. The absolute best way to do this is with drip acclimation.
This technique involves slowly dripping your aquarium's water into the bag or container holding the new fish over the course of an hour or two. This gradual process lets the fish adjust slowly to the temperature, pH, and salinity of its new environment. It dramatically reduces shock and gives your new inhabitant the best possible chance of survival. It’s a small investment of time that pays off massively for the long-term health of your fish.
Common Questions About Setting Up a New Aquarium
Even the most well-thought-out plan for a new reef tank is going to come with questions. That’s just part of the journey, and it’s completely normal. Going from an empty glass box to a vibrant, living ecosystem is a process filled with learning moments.
Let's dive into some of the most common questions I hear from reefers just starting out. These are the usual hurdles that can feel a bit daunting at first. Think of this as your quick-reference guide to get you past those initial uncertainties with confidence.
How Long Does It Really Take to Cycle a New Aquarium?
This is the big one, and the answer is always patience. While you can get your tank, stand, and equipment physically set up in a day or two, the critical biological cycling process takes much longer—usually somewhere between four to eight weeks.
During this time, you're not just waiting around. You're cultivating colonies of beneficial bacteria on your live rock and sand. These microscopic powerhouses are essential for converting toxic ammonia and nitrite into less harmful nitrate. There's no faking it; you absolutely have to track this process with good-quality test kits.
Your cycle is only truly done when your tests consistently read zero ammonia and zero nitrite, and you see a corresponding rise in nitrates. Trust me, rushing this step is the single biggest mistake new hobbyists make, and it almost always leads to losing fish and corals. While some bottled bacteria products can give the process a kickstart, there is no real substitute for patient observation and testing.
What Are the Biggest Unexpected Costs of a Reef Tank?
Most people budget for the big-ticket items like the tank and lights, but it's the ongoing, consumable costs that really catch them by surprise. These are the recurring expenses that become a permanent part of your reefing budget.
You'll be buying high-quality salt mix, various fish and coral foods, test kit reagents, and replacement filter media on a regular basis. The cost of livestock—the fish, corals, and invertebrates themselves—can also add up much faster than you might think.
The other hidden cost that often gets overlooked? Electricity. Your lights, pumps, heater, and protein skimmer are running 24/7, and that can make a noticeable difference on your monthly utility bill.
As a rule of thumb, I always tell people to budget an extra 15-20% of their initial setup cost to cover these consumables for the first six months. It gives you a much-needed buffer and a safety net for things like a pump failing or other surprises.
Can I Use Tap Water for My Saltwater Aquarium?
Let me be crystal clear on this one: absolutely not. You should never, ever use untreated tap water to fill your reef tank or for mixing new saltwater. It is a one-way ticket to frustration and failure.
Tap water is a chemical cocktail of things that are harmless to us but disastrous for a reef. It contains chlorine or chloramine (to kill bacteria), heavy metals from the pipes, and often high levels of phosphates and silicates. These last two are pure fuel for massive, hard-to-beat algae outbreaks.
For a successful reef tank, you must use Reverse Osmosis Deionized (RO/DI) water. This multi-stage filtration process strips tap water of virtually all impurities, leaving you with pure H2O—a clean slate.
Investing in your own home RO/DI unit is one of the smartest moves you can make in this hobby. It guarantees you have a consistent source of pure water and sidesteps countless common algae and water chemistry problems before they ever start. It might feel like a big purchase upfront, but it pays for itself over and over in the health of your reef and your own sanity.
Ready to give your new reef the best possible start? Seeding your tank with a diverse population of live copepods and phytoplankton establishes a robust food web from day one. At PodDrop Live Aquarium Nutrition, we provide pure, lab-cultured life to fuel your ecosystem.
Explore our live nutrition blends and start your reef off right at https://www.getpoddrop.com!