
A Practical Guide to Your Refugium for Reef Tank
So, what exactly is a refugium? In simple terms, it's a safe zone connected to your main reef tank, usually tucked away in the sump. This protected space is dedicated to growing beneficial organisms—things like macroalgae and tiny crustaceans (copepods)—that you want in your system but would quickly get eaten in the main display.
The real magic is in what a refugium does. It acts as a powerful natural biological filter, pulling excess nutrients like nitrates and phosphates out of the water. At the same time, it cultivates a self-sustaining source of live food, creating a much healthier and more stable environment for your corals and fish.
Why Your Reef Tank Needs a Refugium

Don't think of a refugium as just another piece of gear. It's the biological engine that can make your entire reef tank run smoother. It helps transform your aquarium from a closed box needing constant tinkering into a more balanced, self-regulating ecosystem that mimics a tiny slice of the ocean.
A Natural Nutrient Export System
At its heart, a refugium is all about managing nutrients. When you grow macroalgae like Chaetomorpha (we call it "Chaeto") under its own light, you’re creating a highly effective, living filter.
As the algae grows, it fuels itself by absorbing nitrates and phosphates directly from the water column. These are the same compounds that feed the pest algae you're always scraping off your glass. When you trim and remove a handful of the macroalgae every week or two, you're physically taking those locked-up nutrients out of your system for good. It’s a beautifully simple and organic approach to filtration that’s often more stable than relying on chemical media alone.
The Ultimate Live Food Factory
For a lot of reefers, myself included, this is the best part. A good refugium for a reef tank is a pod-producing powerhouse. It becomes a safe harbor where copepods and amphipods can breed like crazy, far from the hungry mouths of your fish. These little critters are a super-nutritious food source for so many reef inhabitants:
- Mandarins & Dragonets: These guys are notoriously picky and often rely exclusively on a steady diet of live pods to survive. A refugium is practically a requirement for keeping them long-term.
- Wrasses & Pipefish: Always on the hunt, these fish thrive with a constant supply of live snacks drifting out of the sump.
- Corals & Filter Feeders: Even your corals will benefit from catching the tiny zooplankton that gets swept into the display, helping boost their color and growth.
This steady stream of live food flowing from the refugium is a game-changer. It mirrors what happens on a natural reef, leading to less stressed, healthier, and more active fish.
A well-established refugium creates a robust food web, reducing your reliance on frozen or prepared foods and ensuring even the most finicky eaters get the nutrition they need to thrive.
Using a refugium as a biofilter isn't a new idea; it's a technique that really took off in the hobby back in the early 1990s as reefers looked for more natural solutions. Today, a properly set up 'fuge is credited with exporting up to 85% of excess nitrates and phosphates and supporting 40-60% higher microfauna populations. It's a proven method with decades of success behind it. You can learn more about the market trends shaping modern reef aquariums to see how things have evolved.
Designing and Equipping Your Refugium
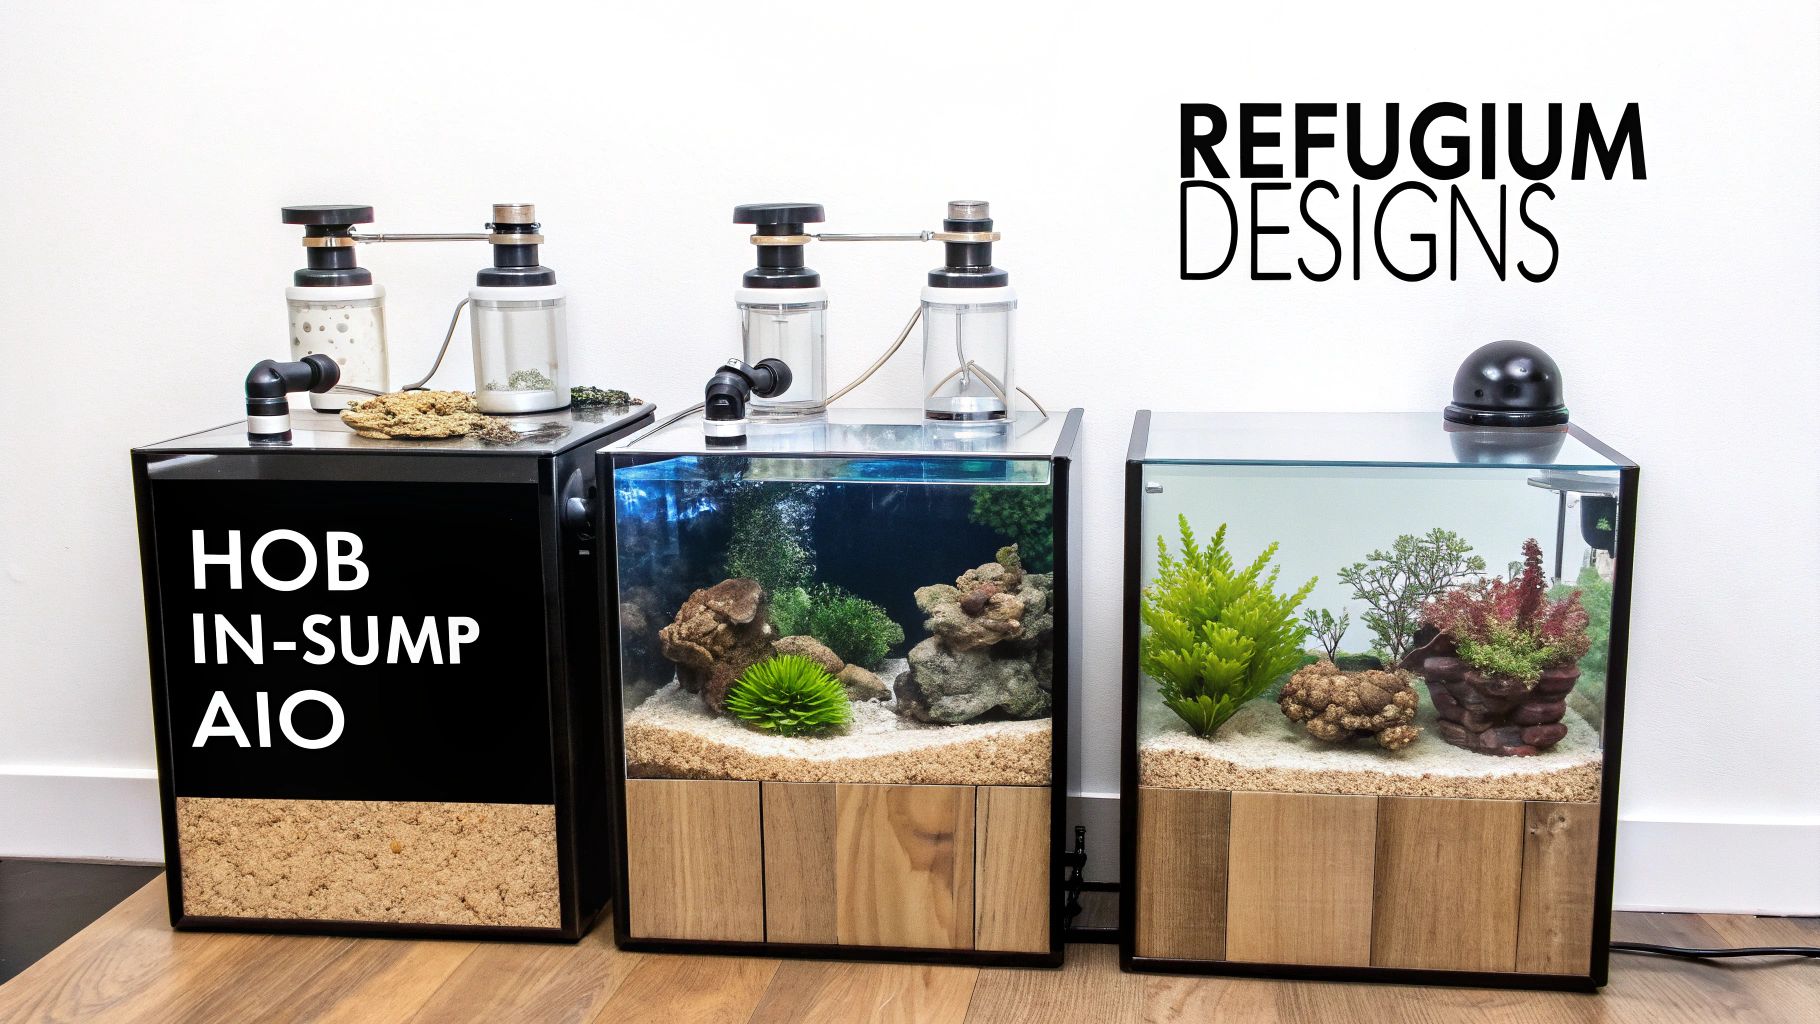
Before you even think about buying gear, the first step is figuring out where this little ecosystem is going to live. A refugium isn't a one-size-fits-all addition; the best approach really depends on your current setup, your tank's size, and what you're trying to achieve.
Let’s look at the three most common ways to integrate a refugium into a reef tank.
- In-Sump: This is the classic, go-to method for most reefers, and for good reason. Tucking a dedicated refugium chamber into your sump keeps everything clean, hidden, and stable. It’s hands-down the best option for tanks over 40 gallons where you want plenty of room for macroalgae to grow and copepods to multiply.
- Hang-on-Back (HOB): Don't have a sump? No problem. HOB refugiums are fantastic, self-contained units that hang right on the back of your display tank. They’re a simple, plug-and-play solution, especially for smaller systems.
- All-in-One (AIO): If you run an AIO tank, you might already have the perfect spot. Many AIOs have an unused back chamber just waiting to be converted. It’s an incredibly efficient way to add the benefits of a refugium to a nano tank without any external clutter.
Getting The Right Gear Together
Once you've decided on the "where," it's time to gather the "what." Getting the core hardware right from the start will save you a ton of headaches down the road.
The absolute most important factor is low, gentle flow. I can't stress this enough. You want just enough movement to slowly tumble the macroalgae so all sides get exposed to light. Too much flow, and you’ll just have a green smoothie. A small, adjustable utility pump is your best friend here.
For an in-sump build, you’ll also need to think about plumbing and baffles to control the water's path and, crucially, to keep your substrate from getting blasted all over the sump. And, of course, you'll need a light, which we'll dive into next.
The pump choice is non-negotiable. If the flow is too strong, it will shred your macroalgae and make it impossible for copepods to settle down and breed. A good rule of thumb is to aim for a turnover rate of about 3-5 times the refugium's volume per hour.
So, if you have a 10-gallon refugium chamber, a small pump rated for just 30-50 GPH is all you need. This gentle current creates that perfect, peaceful environment for everything to thrive.
If you’re going the DIY route, you can get more into the weeds on setting up your baffles and plumbing with our detailed guide on the in-sump refugium. Taking the time to plan this out ensures your refugium becomes a stable sanctuary, not a turbulent mess, paving the way for a healthy macroalgae farm and a booming pod population for your fish and corals.
Choosing the Right Light and Substrate
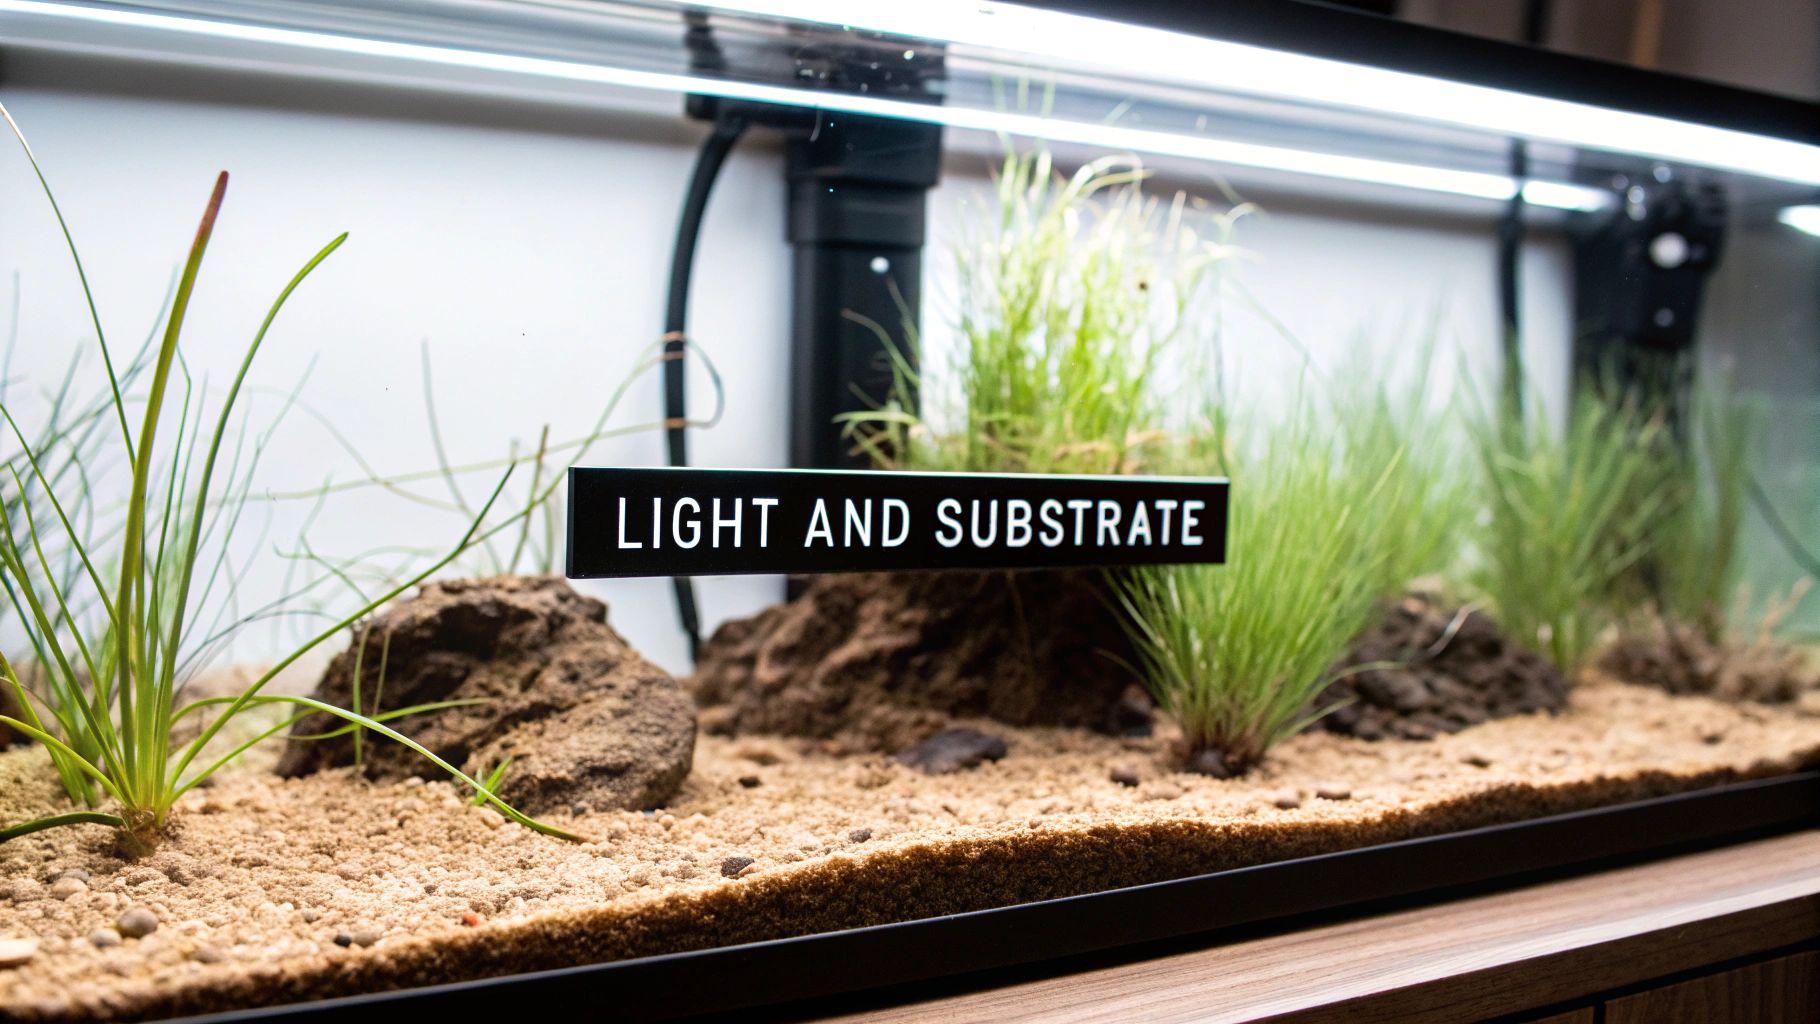
Alright, let's get into the two most critical decisions for your refugium: the lighting and the substrate. Think of this little ecosystem as a dedicated underwater garden. Just like any garden, it needs the right kind of "sun" and "soil" to really thrive. If you nail these two things, you'll have a nutrient-exporting machine that benefits your entire reef.
Your macroalgae, the star player in your refugium, relies on light to photosynthesize. This is the process that pulls unwanted nitrates and phosphates right out of the water column. The trick isn't just to blast it with light, but to be smart about when you do it.
The Power of a Reverse Photoperiod
One of the best-kept secrets of successful reefing is running your refugium on a reverse photoperiod. It’s simple: when your display tank lights go off for the night, your refugium light comes on. This simple schedule is a game-changer for overall tank stability.
Here's why it works so well. During the day, all the photosynthesis in your main tank drives your pH up. At night, respiration takes over, and your pH naturally drops. By firing up the 'fuge light overnight, you keep photosynthesis chugging along 24/7. This helps to counteract that nightly pH swing, creating a far more stable environment for your sensitive corals.
You don't need to break the bank on a fancy light, either. A basic LED grow light, especially one with a more reddish spectrum, is perfect for the job. We're growing algae here, not high-end SPS corals. Consistency is what really matters. If you want to get into the weeds on different types of algae, check out our comprehensive guide to marine aquarium macroalgae.
What Macroalgae Should You Grow?
Choosing the right macroalgae is key to your refugium's success. Some grow fast and soak up nutrients like a sponge, while others provide better habitats for copepods. There's also the risk of certain algae "going sexual," where they release spores and gametes into the tank, which can be messy and counterproductive.
Here's a quick comparison of the most popular choices reefers use.
Macroalgae Selection Guide for Your Refugium
| Macroalgae Type | Nutrient Export | Growth Rate | Copepod Habitat | Risk of Going Sexual |
|---|---|---|---|---|
| Chaetomorpha (Chaeto) | Excellent | Fast | Excellent | Low |
| Caulerpa | Excellent | Very Fast | Good | High |
| Red Mangroves | Moderate | Slow | Good (Roots) | None |
| Ulva (Sea Lettuce) | Good | Fast | Fair | Moderate |
| Gracilaria (Red Ogo) | Good | Moderate | Fair | Low |
For most reefers, Chaetomorpha is the gold standard. It's a workhorse that grows quickly, doesn't go sexual easily, and creates a fantastic tangled-up home for copepods. While Caulerpa is an even faster grower, the high risk of it going sexual makes it a bit too risky for many hobbyists.
Laying the Foundation: Substrate Choices
The substrate in your refugium is so much more than just a layer of sand or rock. It’s a living, breathing habitat. It provides a massive surface area for beneficial bacteria to grow and gives your copepod population a safe place to breed and multiply away from hungry fish.
Your choice of substrate really depends on your goals for the system.
- Deep Sand Bed (DSB): This involves a sand bed of 4-6 inches. A DSB creates different oxygen zones. The top layer is aerobic (oxygen-rich), while the deep, undisturbed layer becomes anaerobic (oxygen-poor). This deep zone is where denitrifying bacteria can live, converting nitrates into harmless nitrogen gas that simply bubbles out of your tank.
- Miracle Mud: This is a popular, specialized substrate loaded with minerals and trace elements. Over time, it slowly releases these beneficial elements into the water, which can help your corals and macroalgae. It's also an incredible environment for tiny critters like bristle worms and copepods to burrow in.
- Live Rock Rubble: Creating a bottom layer of coarse rock rubble is a fantastic way to build a five-star hotel for copepods. The nooks and crannies offer tons of surface area and hiding spots. It also helps keep water flowing through the bottom of the 'fuge, preventing dead spots where detritus can build up.
- Bare Bottom: The simplest approach of all. A bare-bottom refugium maximizes flow and makes it incredibly easy to siphon out any settled detritus. You sacrifice some habitat for pods, but the ease of maintenance is a big plus for some aquarists.
A well-run refugium, lit on a reverse cycle, doesn't just lower your nitrates. It also becomes a phytoplankton and copepod factory. It's not uncommon to see copepod populations explode by 300-500% within just a few weeks, providing a constant, nutritious food source for mandarins and other picky eaters.
Bringing Your Refugium to Life

Alright, your refugium is built and the equipment is humming along. Now for the fun part—actually bringing this little ecosystem online. This is where we go from an empty box to a thriving biological powerhouse. It’s more than just adding some algae; it's about making deliberate choices to kickstart a stable and productive filter from the get-go.
The heart of your refugium for reef tank will be the macroalgae. For most of us, that means a healthy portion of Chaetomorpha (or "Chaeto"). Think of it as the engine for nutrient export. Giving it a solid start is probably the single most important thing you can do for the long-term success of your 'fuge.
Preparing and Placing Your Macroalgae
When you get your new ball of Chaeto, resist the urge to just toss it in. A few minutes of prep can save you a massive headache down the road by preventing unwanted pests from getting a foothold in your system.
I always give new macroalgae a quick rinse in a separate bucket of tank water. Swirl it around gently and keep an eye out for any freeloaders. You're looking for things like Aiptasia anemones, flatworms, or even other types of nuisance algae. Pick them out. This simple five-minute quarantine is your best defense.
Once it's clean, place the Chaeto into your refugium. The goal here is to get a slow, gentle tumble going. This movement ensures the entire algae mass gets exposed to light, which stops the center from dying off and maximizes its growth. More growth means more nutrient export.
Pro Tip: Don't cram the chamber full right away. I’ve found it’s best to start with a clump that fills about half the available space. This gives the algae plenty of room to grow and expand, making your harvests less frequent but more effective.
Seeding Your Copepod Population
With the algae in, it’s time to turn your refugium into a live food factory by adding copepods. Sure, you could get a scoop of sand or a rock from a buddy's tank, but I strongly recommend investing in clean, lab-cultured copepods. It's a much more reliable way to build a diverse and robust population of microfauna.
Why go with cultured pods? They’re guaranteed to be free of pests and diseases. Plus, you know exactly which species you’re adding. This allows you to choose pods that are best suited for your specific tank's needs.
Different pods have different jobs. For example:
- For Detritus Control: If you want a cleanup crew for your sand bed and rocks, Tisbe biminiensis is a great choice. They're detritivores that hang out in the substrate, constantly munching on waste.
- For Feeding Finicky Fish: Got a mandarin or a picky wrasse? A fast-reproducing species like Tigriopus californicus is perfect. They provide a steady stream of nutritious food that will eventually find its way into your display tank.
- For Maximum Biodiversity: The best approach is often a multi-species blend. Different pods occupy different niches within the refugium and tank, creating a far more stable and resilient micro-ecosystem.
If you want to get into the weeds on which species do what, you can learn a lot more about the different types of live copepods and what they bring to a reef tank.
https://getpoddrop.com/blogs/blog/live-copepods
Acclimating Your New Arrivals
Once you have your pods, getting them settled in is easy, but one small step makes a huge difference.
First, kill the flow. Turn off any pumps going into or out of the refugium. Then, gently pour the entire bottle—pods and the water they came in—directly into the macroalgae. Now, just walk away for at least 30 minutes before you turn the pumps back on.
This quiet period gives the copepods a chance to dive into the Chaeto and substrate to find cover before the current starts ripping again. It dramatically increases the number of pods that successfully colonize their new home, ensuring you get a self-sustaining population off to a strong start.
Tending to Your Underwater Garden: Refugium Maintenance and Harvesting
Think of your refugium as an underwater garden. It’s not a “set it and forget it” piece of equipment. To get the most out of it, you’ll need to do a little regular tending. Don't worry, this isn't complicated stuff. A simple, consistent routine is all it takes to keep your refugium working hard, exporting nutrients, and teeming with beneficial life.
The biggest job, by far, is harvesting your macroalgae. As fast-growing algae like Chaetomorpha grows, it soaks up nitrates and phosphates from the water. When you pull a chunk of that algae out, you’re physically removing those nutrients from your aquarium for good. That's the whole magic of it.
Getting the Macroalgae Harvest Right
How often you harvest depends entirely on how fast your algae is growing, which is a great visual cue for your tank’s nutrient levels. For most reef tanks, trimming things back every one to two weeks is a solid routine to get into.
You're not trying to clear the whole thing out. The goal is to remove about 30-50% of the algae clump each time. This leaves a healthy, thriving population behind to keep on growing and pulling out nutrients without skipping a beat. If you take too much, you can stall its growth. If you take too little, you're not really exporting many nutrients.
Pro Tip: Harvesting does more than just export nutrients. It also keeps the algae clump healthy by allowing light and water to reach the center. Without regular trimming, the inside of a dense Chaeto ball can die off and start to rot, releasing all those trapped nutrients right back into your system.
Keeping Things Clean: Pests and Gunk
While you're in there trimming the algae, take a moment to look around for any unwanted hitchhikers. It's not uncommon to find a stray Aiptasia anemone or a bit of nuisance algae that tagged along. Just pluck them out right away before they have a chance to get comfortable and spread into your main display.
You'll also want to manage the buildup of detritus. Over time, fish waste and uneaten food will settle in the slower-flow areas of your refugium, turning into a sludge that can actually produce nitrates.
- Siphon it out: About once a month, grab a small siphon hose or a turkey baster and gently suck out any gunk that's collected on the bottom.
- Keep the water moving: Make sure your refugium pump is clean and providing good, gentle turnover. This helps prevent dead spots where detritus likes to pile up.
A quick cleanup like this ensures your refugium doesn't accidentally become a source for the very nutrients it's supposed to be removing.
When to Restock Your Pod Population
A well-established refugium will usually have a bustling, self-sustaining population of copepods. But just like any isolated population, genetic diversity can fade over time. Giving your pod population a boost with a fresh batch of live copepods is a fantastic way to keep your reef's food web strong.
I recommend adding a new bottle of pods every six months or so. This little infusion of new genetics keeps the population dense, diverse, and ready to feed your corals and fish. A healthy pod population is more than just fish food; they are a vital part of your clean-up crew, constantly grazing on film algae and detritus. This simple maintenance step truly makes your refugium a cornerstone of your reef's long-term health and stability.
Got Refugium Questions? We've Got Answers.
No matter how long you've been in the hobby, a refugium can throw you a curveball now and then. It's a living, breathing part of your reef tank's ecosystem, and sometimes it has a mind of its own. Let's walk through some of the most common questions and sticking points I hear from fellow reefers.
"My Chaeto Isn't Growing (or It's Turning White). What Gives?"
This is hands-down the most frequent issue people face, and funnily enough, it can mean your refugium is actually too good at its job. If your macroalgae growth has hit a wall or it's losing that deep green color, the most likely cause is a nutrient shortage.
You've probably got your nitrates and phosphates bottomed out at or near zero. When that happens, the algae has literally eaten all the food in the water and is starting to starve. A quick fix is to dial back your lighting schedule by an hour or two to slow down its metabolism.
Another common culprit is a lack of trace elements, especially iron. Macroalgae needs iron to thrive, so dosing a reef-safe iron supplement can often kickstart growth again. And don't forget your light! I've found that a simple, cheap grow light with a red-heavy spectrum often works much better for Chaeto than a fancy, bright white reef light.
"How Can I Tell if My Copepods Are Doing Well?"
The best way is the old-fashioned way: grab a flashlight. Wait an hour or so after your refugium light clicks off for the night, then shine the beam into the 'fuge. You should see a blizzard of tiny white specks zipping around in the water and crawling all over the glass and macroalgae. That's a healthy, booming pod population.
There's also an indirect way to tell. Look at your display tank. Do you have a mandarin goby or a picky wrasse? If that fish is fat, happy, and actively hunting, you can bet it's getting a steady stream of live food from your refugium. A plump mandarin is one of the best signs of a successful 'fuge.
A thriving copepod population isn't just fish food; it's a critical part of your tank's microbiome. These tiny crustaceans act as a cleanup crew, constantly grazing on detritus and film algae, helping to outcompete nuisance pests for available resources.
"Can I Put Other Critters in My Refugium?"
Absolutely, but you have to be selective. The key is to remember the refugium's primary purpose: it's a refuge. Anything you add should support that mission, not disrupt it.
A handful of live rock rubble is a fantastic addition. It adds a ton of surface area for beneficial bacteria and gives your pods more nooks and crannies to breed in. A few mellow snails, like Ceriths or Nassarius, are also great for stirring the sand bed.
What you don't want are predators. That means no fish, no matter how small. No shrimp, especially peppermint shrimp who will happily munch on your pods. And definitely no crabs. The goal here is to cultivate a food source, not decimate it.
"What's That 'Ocean' Smell Coming From My Sump?"
If you're smelling a fresh, earthy, low-tide kind of scent, that's a good thing! It's the smell of a healthy, living ecosystem at work—a mix of algae, bacteria, and all the micro-critters doing their thing.
But if the smell turns foul, like sulfur or rotten eggs, that's a red flag. It almost always points to a die-off or a lack of flow creating an anaerobic "dead spot" in the sand. If you smell this, the first thing to do is check your pump for clogs. Then, gently stir the top inch of the sand bed and pull out any visibly decaying algae.
Ready to seed your refugium with a thriving, diverse population of microfauna? PodDrop Live Aquarium Nutrition provides lab-cultured, pest-free copepods and phytoplankton to create a robust food web in your reef tank. Boost your biodiversity and see the difference.