


How to start a reef tank aquarium: a beginner guide
- fabianbehague
- Nov 12
- 18 min read
Starting a reef tank is an incredible journey. You're essentially taking an empty glass box and patiently coaxing it into a vibrant, living slice of the ocean. It's a process that involves careful planning, selecting the right gear, setting up the physical environment, and then the all-important "cycling" phase to build up the good bacteria that will keep your system healthy.
Your First Step into Reef Keeping

Diving into the world of saltwater aquariums for the first time feels like unlocking a secret. A reef tank isn't just a fish tank; it's a complete, miniature ecosystem where the main event is growing corals and other invertebrates, with fish playing a supporting—albeit beautiful—role.
This means you’re on the hook for creating a very specific environment. You'll need the right lighting, the right water flow, and rock-solid water chemistry to keep these delicate life forms happy.
The payoff is undeniable. There's nothing quite like watching a clownfish wiggle into its anemone or seeing corals pop with fluorescent color under blue lights. But that beauty comes with a real commitment. This isn't a "set it and forget it" kind of hobby. A reef tank is a living piece of art that needs your consistent attention.
Understanding the Commitment
Before you even price out a single piece of equipment, it’s time for a reality check. You should expect to spend a few hours every week on maintenance, especially in the early days. This is your time for water testing, cleaning the glass, and doing water changes.
The upfront cost is also a major consideration. A proper setup can run you anywhere from several hundred to many thousands of dollars, depending entirely on how big and complex you want to go.
The hardest part of starting a reef tank has nothing to do with the science. It’s all about patience. This hobby rewards those who can wait and absolutely punishes those who rush. Every single step, from cycling the tank to adding your first fish, is a waiting game.
This hobby has seen explosive growth, becoming a huge part of the home decor and lifestyle scene. The global market for reef aquariums was pegged at around USD 1.5 billion in 2024, and it's only expected to climb. This boom is a direct result of better technology and a massive online community making it more accessible than ever. If you're into the numbers, you can find a great market trend breakdown in this report on DataHorizzonResearch.com.
The Phases of Building a Reef
Bringing your reef to life happens in stages, with each one setting the foundation for the next. Looking at it as a roadmap makes the whole process feel less overwhelming.
Here’s the basic progression:
Planning and Research: This is where you figure out your budget, how big of a tank you can realistically manage, and what kinds of corals and fish you dream of keeping.
Equipment Acquisition: Time to shop! You'll be picking up the tank, lights, filters, heaters, and pumps to create water movement.
Physical Setup: The fun part begins. You'll assemble the tank, build your rock structure (often called an aquascape), add sand, and mix your saltwater.
The Nitrogen Cycle: This is a crucial waiting period, usually lasting 4-8 weeks, where you let beneficial bacteria colonize your tank and make it safe for life.
Adding Inhabitants: The moment you’ve been waiting for. You'll slowly, methodically introduce your first cleanup crew members, then corals, and finally, your fish.
Choosing Your Foundation Equipment
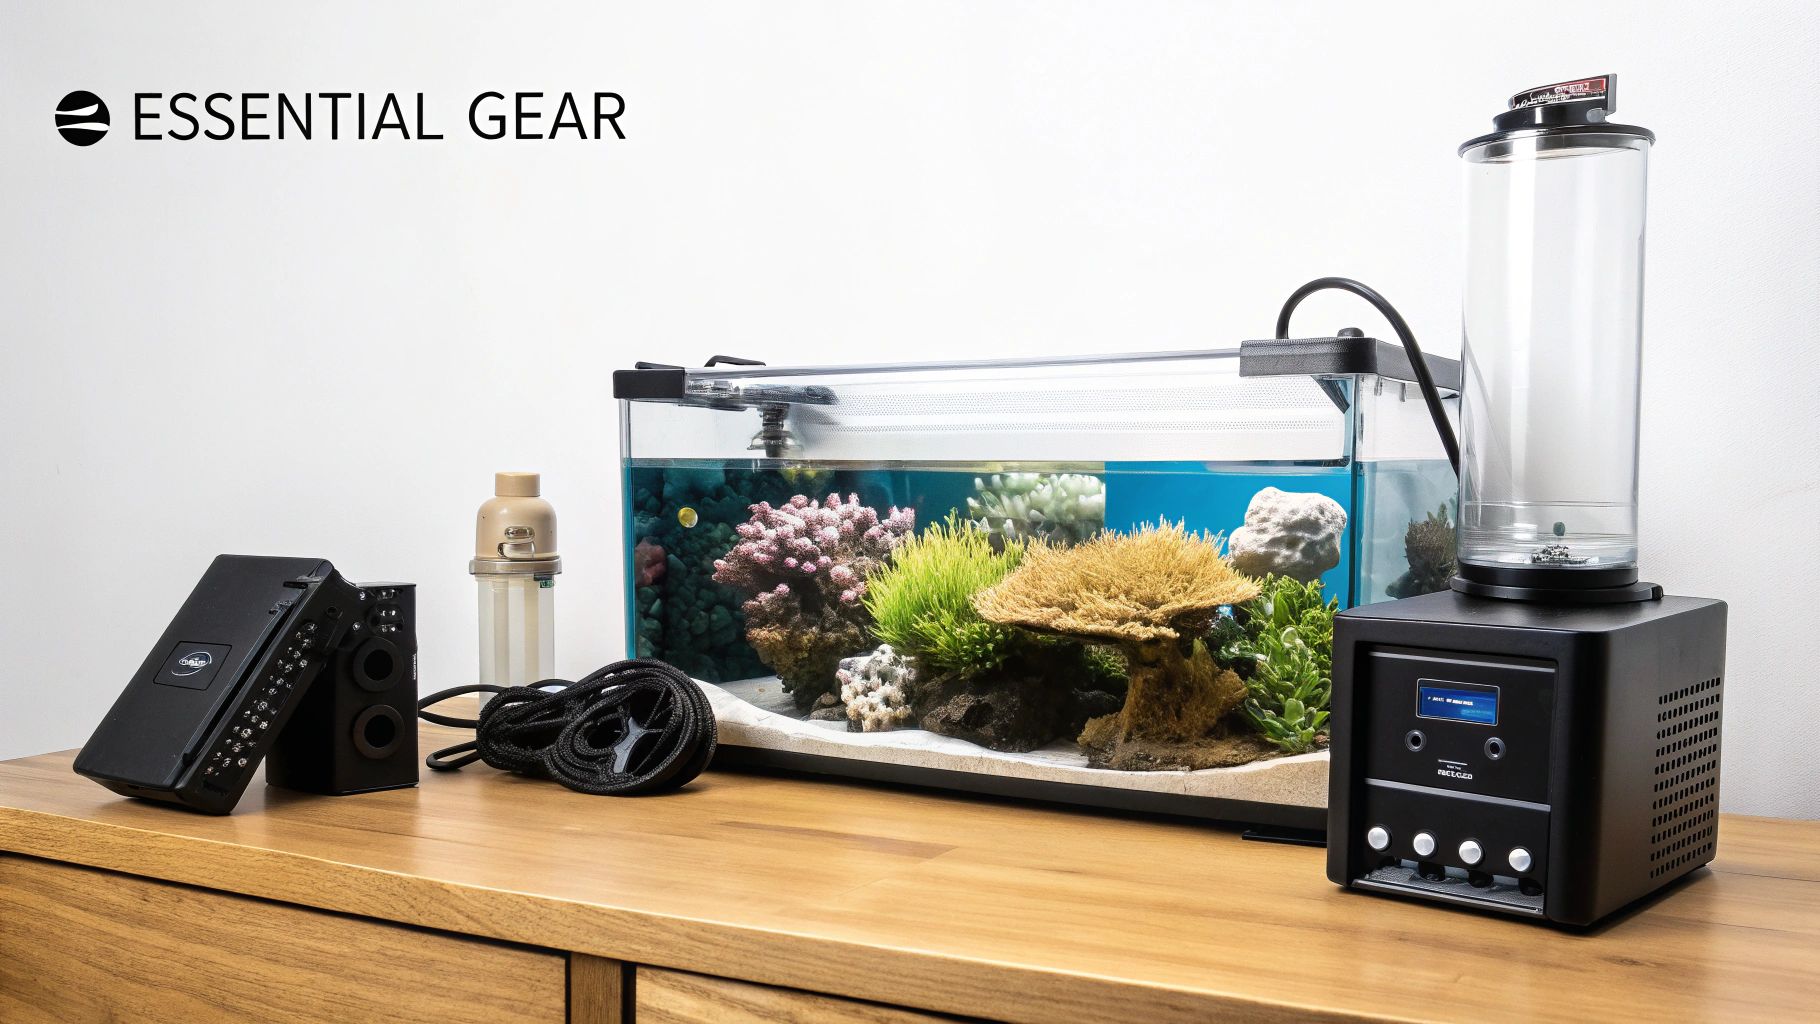
Alright, let's talk gear. Getting your equipment right from day one is probably the single most important thing you'll do. The choices you make now will directly shape your tank's stability, how much time you spend on maintenance, and honestly, how much you enjoy this hobby.
Think of it like building a house—a shaky foundation puts everything else at risk. This isn't about dropping a ton of cash on the fanciest gadgets. It's about picking reliable, correctly-sized gear that creates a stable home for your future fish and corals. Nailing this now saves a world of frustration (and money) later.
Selecting the Right Aquarium
First up is the tank itself. It's incredibly tempting to start with a small nano tank, but here's a bit of reefing wisdom that sounds backward at first: bigger is actually easier for beginners. Why? Stability. Water chemistry, temperature, and salinity can swing wildly in a small volume of water. A larger tank provides a much bigger buffer against common mistakes.
For anyone just dipping their toes in, an All-In-One (AIO) system is a fantastic starting point. These tanks have built-in filtration compartments hidden in the back, which keeps your heater, pump, and other gear out of sight. It gives you a super clean look and makes the whole setup process much simpler.
Still have your heart set on a smaller system? They can be stunning, but they demand more attention. To get it right, check out our guide on how to create a thriving nano reef tank setup.
A simple rule of thumb to live by: a larger volume of water is a more stable one. A mistake like overdosing an additive might be a minor hiccup in a 75-gallon tank, but it can be a total system crash in a 15-gallon nano.
To help you decide, here’s a quick rundown of common beginner tank sizes.
Beginner Reef Tank Size Comparison
This table breaks down some popular starting sizes to help you find the sweet spot between your budget, available space, and long-term goals.
Tank Size (Gallons) | Pros | Cons | Ideal For |
|---|---|---|---|
10-20 (Nano) | Low initial cost, small footprint. | Water parameters swing quickly, very limited livestock options. | Experienced reefers or dedicated beginners who can test daily. |
25-40 (Mid-Size) | Good balance of stability and size, great for AIO systems. | Still requires careful stocking, can feel cramped quickly. | Beginners who want a manageable system with more options than a nano. |
50-75 (Standard) | Very stable, forgiving of small errors, wide range of fish/coral choices. | Higher equipment costs, takes up more space, larger water changes. | The "sweet spot" for most new reefers looking for long-term success. |
90+ (Large) | Ultimate stability, allows for impressive aquascapes and larger fish. | Very expensive, heavy, requires significant planning and maintenance. | Hobbyists with a dedicated space and budget who are in it for the long haul. |
Ultimately, the best tank is the largest one you can comfortably fit and afford. The extra stability it provides is worth its weight in gold when you're just starting out.
Illuminating Your Reef
Lighting is easily the most debated and complex piece of equipment. This isn't just about making your tank pretty—it's the life-support system for your corals. The light you choose needs to provide the specific spectrum and intensity (known as PAR) that corals use for photosynthesis to survive and grow.
LEDs (Light Emitting Diodes): These are the undisputed king of reef lighting today, and for good reason. They're incredibly customizable, energy-efficient, and don't heat up your tank water like older tech. You can control everything from the color spectrum to intensity, and even mimic a natural sunrise and sunset.
T5 Fluorescents: T5s were the gold standard for years, and many old-school reefers still swear by them for the even, blanket-like light they produce. The downside? You have to replace the bulbs every 9-12 months, and they generate a lot more heat, which can mess with your tank's temperature.
For a beginner, a quality, programmable LED fixture is the way to go. It offers the best mix of performance, control, and long-term value.
Creating a Living Filtration System
In a reef tank, filtration is a biological process, not a mechanical one. The real engine of your aquarium is biological filtration, which is powered by billions of beneficial bacteria living on your rock and sand.
Live Rock or Dry Rock? This is the foundation of your biological filter. Live rock arrives "pre-seeded" with beneficial bacteria and other critters, which can jump-start your tank's cycle. However, it can also introduce pests. Today, most beginners start with dry rock. It's sterile—meaning no unwanted hitchhikers—but it takes a bit longer for the beneficial bacteria to grow and colonize it.
Protein Skimmers: A skimmer is an absolute workhorse. It removes organic waste before it can break down into nitrate and phosphate, which fuel algae growth. It works by injecting fine air bubbles into a chamber, creating a foam that pulls dissolved gunk out of the water. While you might get away without one on a tiny nano, a protein skimmer is highly recommended for any tank over 30 gallons.
Water Movement and Temperature Control
A reef is a high-energy environment, not a calm pond. Good flow is critical. It delivers food to your corals, carries their waste away, and keeps debris (detritus) suspended in the water so your filtration can remove it.
You create this flow with wavemakers or powerheads—small pumps you place inside the tank. The goal isn't just to blast water around, but to create a gentle, varied, and random current that mimics a natural reef. Often, using two smaller powerheads on opposite sides of the tank works much better than one big, powerful one.
Finally, a reliable heater is non-negotiable. Most corals and fish need a stable temperature between 75-78°F (24-26°C). Big swings in temperature are a huge source of stress. Don't cheap out here—buy a quality heater and seriously consider plugging it into a separate digital temperature controller for an extra layer of protection. It's cheap insurance against a catastrophic failure.
Building Your Underwater Landscape
Alright, you've got the gear. Now for the fun part—transforming that empty glass box into a miniature slice of the ocean. This is where your vision starts to take shape, but the very first decision you make is surprisingly one of the most critical: where to put the tank. Get this wrong, and you could be setting yourself up for headaches later.
First things first, your tank must be perfectly level. An unlevel tank puts incredible, uneven stress on the glass seams, which is a major risk for leaks down the line. Don't eyeball it; use a proper carpenter's level on the stand and the floor. If you find a slant, use shims to get it dead-on perfect.
Think carefully about the location, too. Keep it away from direct sunlight, which is basically a recipe for frustrating algae outbreaks and wild temperature swings. You’ll also want it close to a few electrical outlets but out of the way of any high-traffic zones where it could get bumped or knocked.
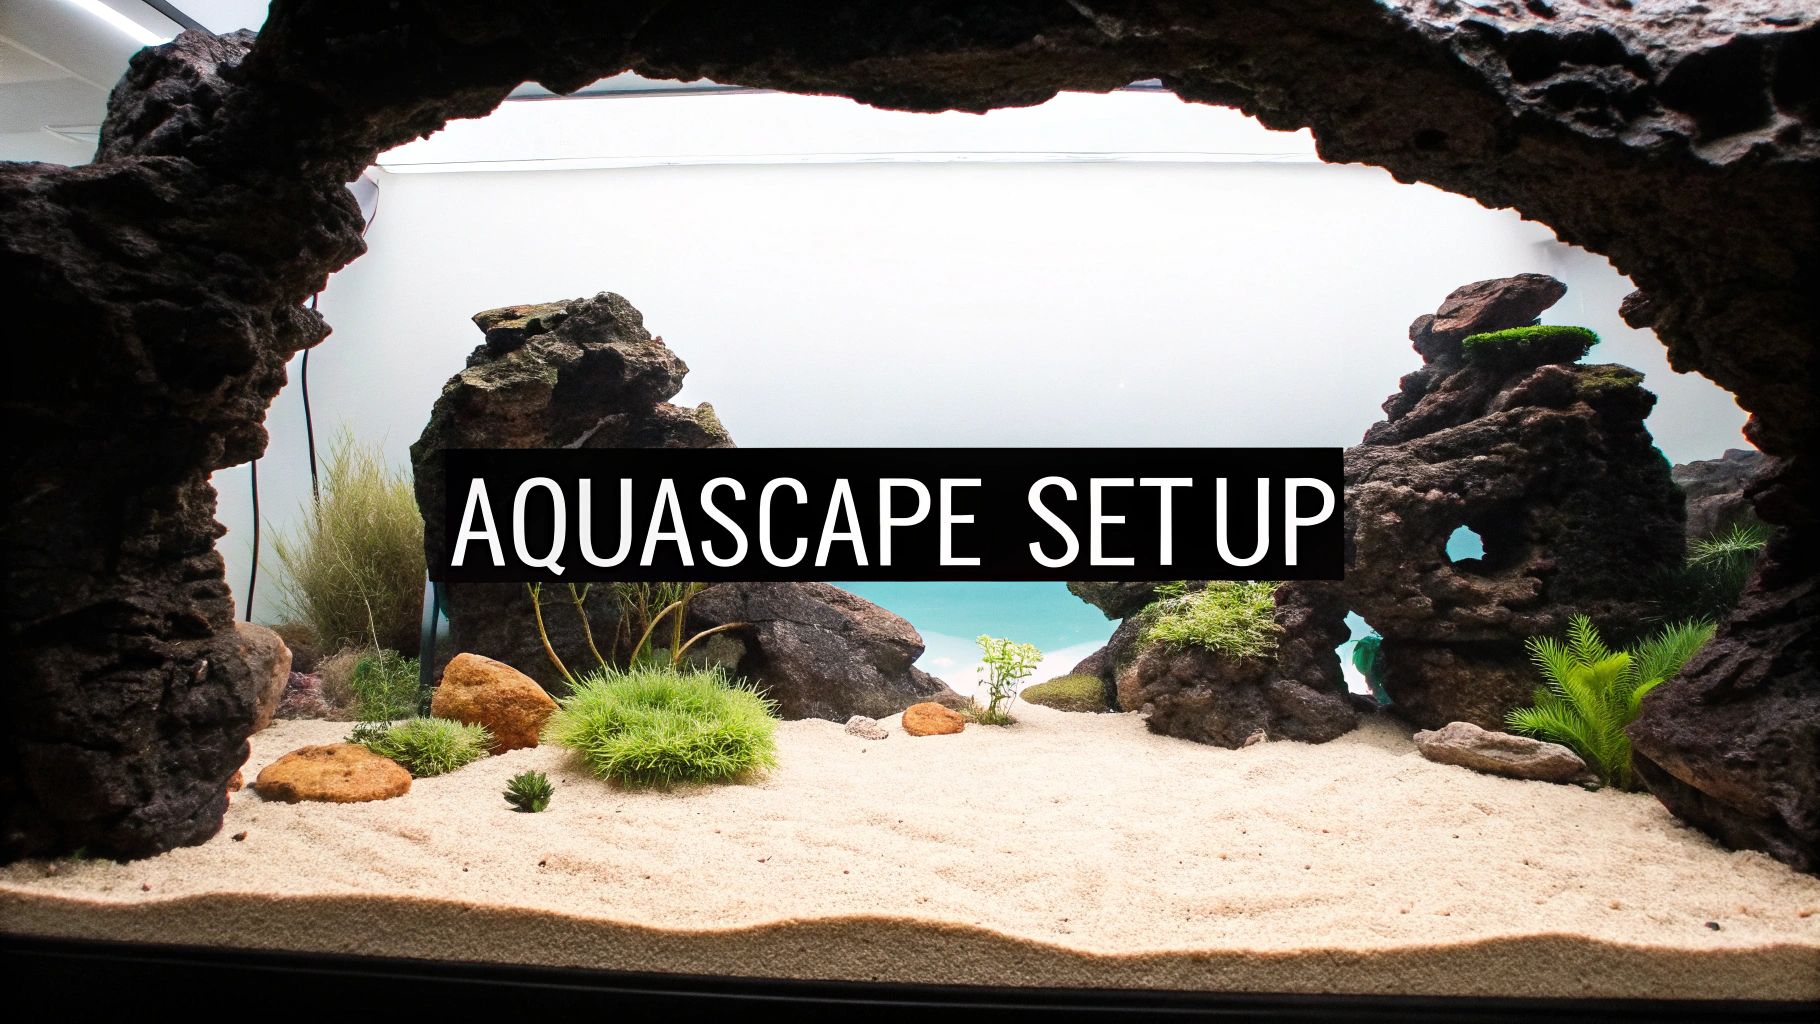
Designing Your Aquascape
Aquascaping is the art of arranging rock in your tank, but it's much more than just decoration. This rockwork is the foundation of your entire ecosystem. It provides the primary surface area for all that beneficial bacteria we talked about, creates a home for your corals, and gives fish caves and hiding spots to feel secure.
You've got three main choices when it comes to rock:
Live Rock: This stuff comes straight from the ocean, already teeming with beneficial bacteria and other microorganisms. It's a great way to jump-start your tank's cycle, but it comes with a gamble—you could introduce pests like Aiptasia anemones or nuisance algae.
Dry Rock: Essentially, this is natural rock that's been dried out, making it completely sterile. It has become the go-to for most hobbyists because you have total control. No hitchhikers, no surprises.
Artificial Rock: This man-made rock is lightweight, guaranteed to be pest-free, and often comes in incredible shapes that are tough to replicate with natural pieces. It's porous and will become "live" over time as bacteria colonize it.
As you build, focus on creating an open structure with lots of gaps and caves. This isn't just for looks; it promotes good water flow through the rockwork and prevents "dead spots" where detritus and waste can build up.
The best aquascapes I've seen almost always follow a "less is more" philosophy. Fight the urge to build a solid wall of rock. Instead, try creating two or three separate islands or pillars. This creates negative space, which actually makes the tank feel bigger and gives your fish clear lanes to swim.
Preparing the Water and Sand
With your rockscape in place, it's time to add the lifeblood of the aquarium: saltwater. You absolutely must use RO/DI (Reverse Osmosis/Deionization) water. This is water that's been purified to strip out all the nasty stuff in tap water like chlorine, heavy metals, and phosphates. Seriously, never use untreated tap water.
To get your saltwater mixed, you’ll need a clean, food-safe bucket, your chosen salt mix, and a small powerhead to keep things moving. Add the salt to the RO/DI water slowly while the powerhead is running; this helps it dissolve completely without clumping up.
You'll need a refractometer to measure the salinity, which is just the amount of dissolved salt in the water. For a reef tank, your target is a specific gravity of 1.025-1.026. Precision here is important. Consistency is the key to a stable environment for your future inhabitants.
Once the saltwater is mixed and the salinity is spot-on, you can add your sand. Gently pour the sand into the bottom of the tank to create a layer that's about 1-2 inches deep. Anything deeper can trap harmful gas pockets, while a layer that's too thin can get blown all over the place by your pumps.
Finally, you can start filling the tank. Pour the saltwater slowly over a piece of rock or onto a plate resting on the sand—this will keep you from kicking up a massive sandstorm. Fill it up just enough to get your equipment like heaters and pumps installed, then top it off the rest of the way.
Now you can power everything on and start the most important waiting game in reefing: the nitrogen cycle.
Navigating the Aquarium Nitrogen Cycle
If there's one lesson every reefer learns the hard way, it's patience. And that lesson starts right here. Before you even dream of adding that first clownfish or vibrant coral frag, your brand-new tank has to transform from a sterile glass box into a living, breathing ecosystem. The invisible engine driving that change is the aquarium nitrogen cycle.
Simply put, the nitrogen cycle is nature's own filtration system. It's the process where armies of beneficial bacteria set up shop in your tank to convert toxic animal waste into something much safer. Rushing this critical stage is easily the most common—and most devastating—mistake new hobbyists make.
Understanding the Key Players
The cycle plays out in three main acts, each with its own chemical star and a specialized crew of bacteria. Your job is to kick things off and then watch from the sidelines as biology does its thing. It's a fascinating, if slow, performance.
First up is ammonia (NH₃). This stuff is incredibly toxic to fish and corals. In an established tank, it comes from fish waste, uneaten food, and any other decaying organic matter. To get the cycle started in a new, empty tank, you have to add an ammonia source yourself.
Next, a specific group of beneficial bacteria begins to multiply, consuming the ammonia and converting it into nitrite (NO₂). Seeing nitrites appear is a good sign—it means the cycle is underway! The bad news? Nitrite is also extremely toxic to marine life.
Finally, a second, completely different strain of bacteria arrives to feast on the nitrite. They convert it into nitrate (NO₃), the final product of the cycle. While high levels of nitrate can still cause problems like algae blooms, it’s vastly less harmful to your tank's inhabitants than either ammonia or nitrite.
Kicking Off and Tracking the Cycle
To get the ball rolling, you need to "ghost feed" your tank by adding a source of ammonia. A popular method is to drop in a small piece of raw shrimp from the grocery store. You can also use a few drops of pure liquid ammonia or even just toss in a pinch of fish food every couple of days. This provides the fuel for that first wave of bacteria to establish a colony.
While this is happening, you need to test your water every few days with a quality saltwater test kit. You're looking for a very specific sequence of chemical spikes and drops, and testing is the only way to know for sure where you are in the process.
The sheer scale of the global reef trade—an estimated 50 million coral reef animals sold to about 2 million hobbyists annually—underscores our responsibility. Properly cycling your tank is the first and most critical step in creating a humane, stable home for these animals. You can find more market insights from the experts at StraitsResearch.com.
The entire cycling process typically takes anywhere from 4 to 8 weeks. Some tanks are quicker, some are slower. The key is to resist the temptation to add livestock until your test kits give you the all-clear.
Here’s a quick rundown of what you should see as the weeks go by:
The Ammonia Spike: In the first week or two, your ammonia levels will climb and then peak as the initial ammonia source breaks down.
The Nitrite Spike: As the first bacteria colony grows, ammonia will start to fall, and you'll see a corresponding surge in nitrite levels.
Nitrates Emerge: Once the second bacteria colony gets established, nitrite will begin to drop, and you’ll finally start to see nitrate readings appear and steadily rise.
Your tank is only considered fully cycled when you can add a dose of ammonia and, within 24 hours, your test kits read 0 ppm ammonia and 0 ppm nitrite. At this point, you'll have a measurable nitrate level. The final step is a large water change to bring those initial nitrates down. Managing these levels becomes a routine part of maintenance, and you can learn some great practical tips to reduce nitrates in a saltwater aquarium to keep your system pristine.
Tracking Your Tank's Nitrogen Cycle
Keeping a log of your water parameters is the best way to visualize your progress. A typical cycle follows a predictable pattern of rising and falling ammonia, nitrite, and nitrate levels. This table gives you a rough idea of what to expect week by week.
Week | Ammonia (ppm) | Nitrite (ppm) | Nitrate (ppm) | Action Required |
|---|---|---|---|---|
1 | 0.5 - 2.0 | 0 | 0 | Add ammonia source, start testing every 2-3 days. |
2 | 1.0 - 0.5 | 0.5 - 2.0 | 0 - 5 | Ammonia drops, nitrite spikes. Keep testing. |
3 | 0 - 0.25 | 2.0 - 0.5 | 5 - 20 | Nitrite peaks then starts to fall. Nitrate rises. |
4 | 0 | 0.25 - 0 | 20 - 40+ | Almost there! Test daily until both are zero. |
5+ | 0 | 0 | 40+ | Perform a large water change to lower nitrates. |
Remember, these are just estimates! Your tank's cycle duration can vary based on the type of rock you used, the temperature, and the ammonia source. The key is to wait for your test kits—not the calendar—to tell you when it's safe to proceed.
Adding Your First Corals and Fish
This is it—the moment all your patience has been building toward. Your tank is cycled, the water parameters are locked in, and that empty, rocky aquascape is begging for some life. But don't let the excitement cause you to rush. A slow, thoughtful stocking plan is what separates a thriving, stable reef from a constant battle with disease and stress.
Adding new inhabitants is a marathon, not a sprint. Every fish or coral you introduce adds to the bioload, which is the total amount of waste your biological filter has to process. If you add too much too fast, you'll overwhelm your beneficial bacteria and trigger a nasty ammonia spike. The golden rule here is to add new livestock one at a time, leaving at least a week or two between each new arrival to let the system catch up.
The Non-Negotiable Quarantine Tank
Before we even think about what to add, we have to cover how you add it. A separate quarantine tank (QT) is the single most important piece of insurance in this entire hobby. It's a simple, bare-bones setup where every new fish and coral lives for 4-6 weeks before it ever sees your display tank.
Why is this so critical? A QT gives you a controlled space to observe new arrivals for any signs of nasty hitchhikers like ich, marine velvet, or coral-munching pests. It is infinitely easier to treat a sick fish in a small quarantine tank than it is to nuke your entire reef with medications that are often toxic to corals and invertebrates.
Think of it like this—you wouldn't let a stranger coughing and sneezing wander through your house. A quarantine tank is the exact same concept for your aquarium. It’s a simple step that protects your entire investment of time, money, and emotional energy.
Your QT doesn't need to be fancy at all. The essentials are:
A small 10-20 gallon tank.
An inexpensive hang-on-back filter for flow and filtration.
A simple PVC pipe elbow for the fish to hide in.
A reliable heater to keep the temperature stable.
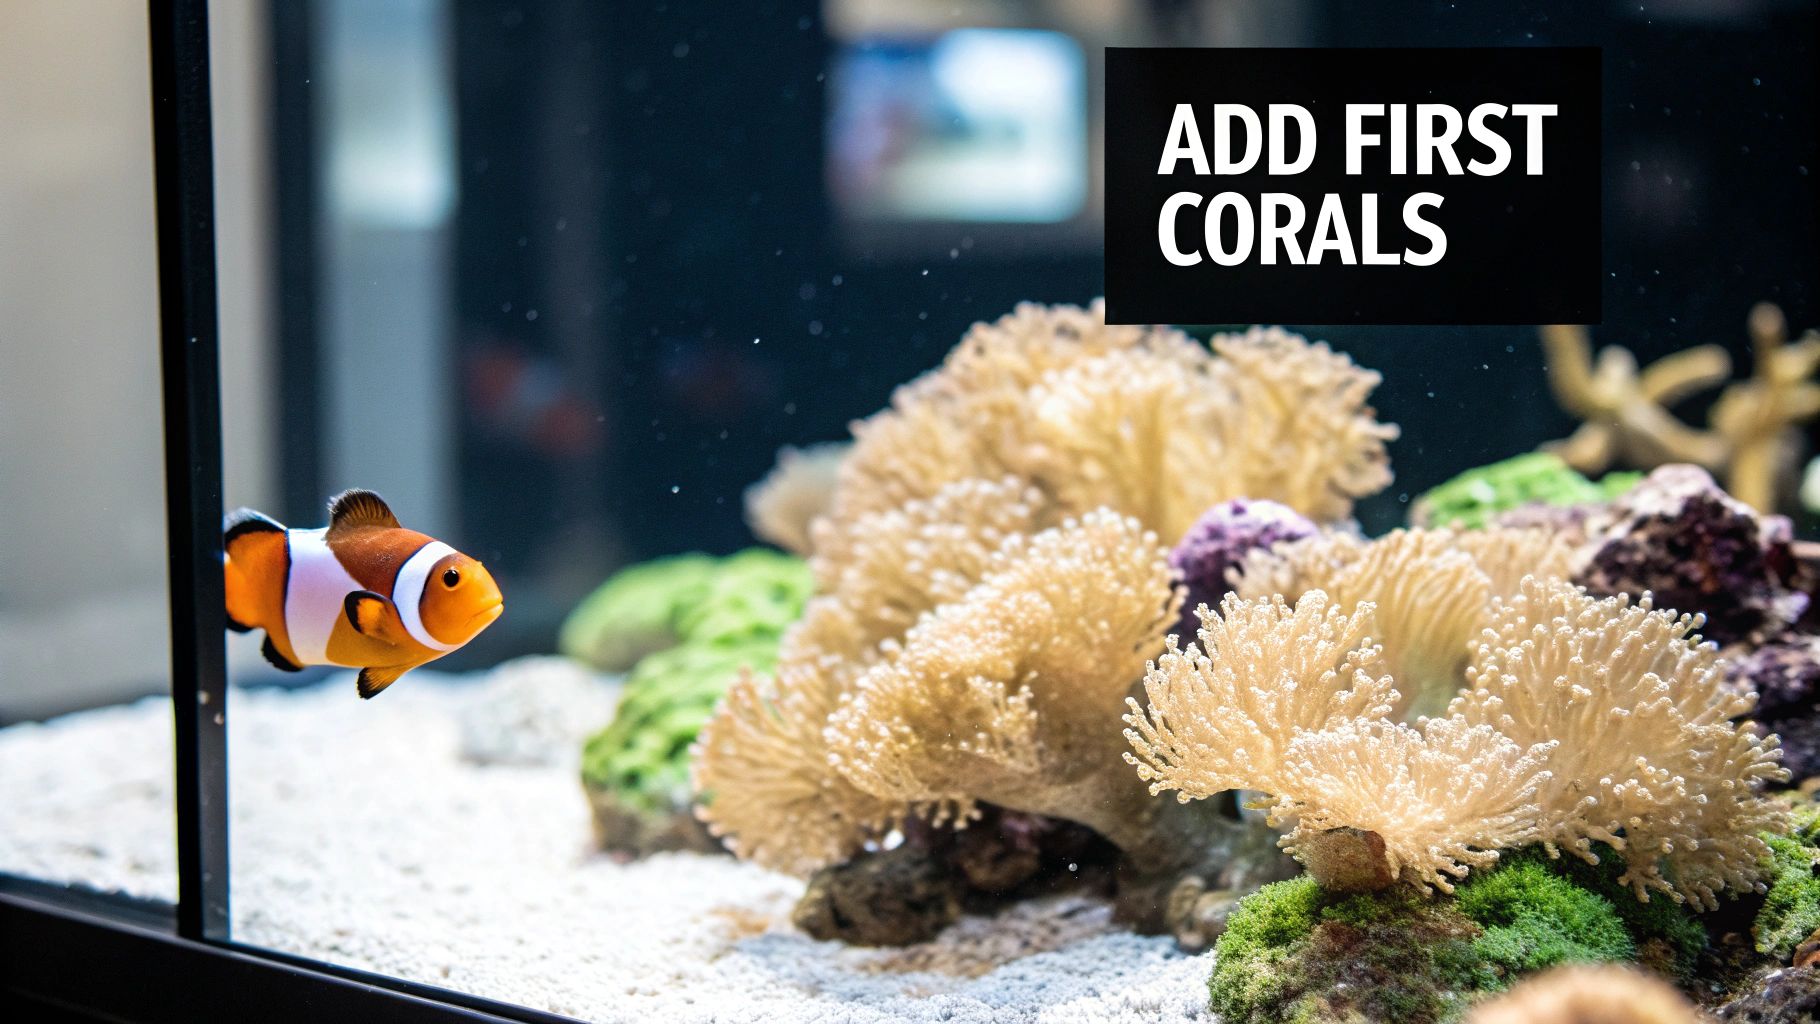
Choosing Your First Corals
Starting with a few hardy and forgiving corals is a great way to build your confidence and get that classic "reef" look. These types of corals are much better at handling the minor parameter swings that are common in a new system.
Zoanthids and Palythoas: Known in the hobby as "Zoas" and "Palys," these are colorful, button-like polyps that grow in mats across your rockwork. They're relatively low-maintenance and come in an insane variety of color combos. They do well in moderate light and flow.
Leather Corals: Soft corals like the Toadstool or Finger Leather are incredibly tough. They add beautiful texture and movement to the tank and are far less demanding about lighting and water flow than many other corals you'll encounter.
Selecting Your First Fish
Your first fish should be just as bulletproof as your first corals. You're looking for species known for being resilient, having a peaceful personality, and staying a manageable size.
Two of the most classic beginner choices are:
Ocellaris Clownfish: These guys are famous for a reason. They're hardy, absolutely packed with personality, and stay small. They adapt incredibly well to aquarium life and are a perfect first fish for almost any reef tank.
Gobies and Blennies: This is a huge group of fish with some fantastic choices like the Yellow Watchman Goby or the Lawnmower Blenny. They tend to stick to the rockwork and sandbed, stay small, and many of them even help with cleanup duty.
For a deeper look into great starter fish, our guide to starter fish for saltwater tanks has a fantastic list of options and their specific care needs.
Proper Acclimation Is Key
Once a new resident has cleared quarantine, it's finally time for the big move. This is a stressful transition, and your goal is to make it as smooth as possible through a process called acclimation. It's all about slowly adjusting the new arrival to your tank's specific temperature and water chemistry.
The drip acclimation method is tried-and-true:
First, float the sealed bag in your tank for 15-20 minutes. This equalizes the temperature.
Next, carefully empty the bag (fish and all its water) into a clean bucket.
Using a piece of airline tubing, start a very slow siphon from your main tank into the bucket. You're aiming for just 2-4 drips per second.
Once the water volume in the bucket has doubled (this usually takes about an hour), you can gently net the fish and place it in your tank. Critically, never add the dirty bag water to your aquarium.
By sticking to a slow stocking plan, quarantining every new arrival without exception, and acclimating carefully, you're setting yourself up for a stable, healthy, and stunning reef tank for years to come.
Answering Your Top Reef Tank Questions
Getting into reefing is an amazing journey, but let's be real—it comes with a lot of questions. I've been there. Staring at equipment, wondering what's really necessary and what's just hype. This is where we tackle some of the most common questions that pop up for newcomers, giving you straight answers to help you start strong.
How Much Does It Really Cost to Start a Reef Tank?
This is the big one, isn't it? The honest answer is: it varies wildly. You could piece together a basic nano setup for around $500, but a larger, more tricked-out system can easily run into several thousand dollars.
Your biggest initial expenses are the non-negotiables: the tank itself, a quality LED light (this is crucial for corals), a solid filtration system (a protein skimmer is a game-changer), a heater, wavemakers for flow, and your foundational rock and sand. But don't forget the ongoing costs. You'll be buying salt mix, food for fish and corals, water testing kits, and paying for the electricity to keep it all humming.
Here’s a piece of advice I give everyone: figure out your initial budget, then add another 20% on top. Trust me, this little cushion will cover all those unexpected but inevitable purchases, like a better test kit or that extra powerhead you suddenly realize you need for perfect flow.
Live Rock vs. Dry Rock: What's the Difference?
This is a foundational choice that sets the stage for your tank's entire biological journey. Live rock comes straight from the ocean, teeming with the beneficial bacteria needed to kickstart your nitrogen cycle. It can get your tank cycled much faster, which is a huge plus. The downside? It can also bring along unwanted hitchhikers like Aiptasia anemones or stubborn nuisance algae.
Dry rock, as the name implies, is completely sterile. This gives you total control—no surprise pests. The trade-off is that you're starting from scratch, so the cycling process will take longer while you wait for beneficial bacteria to colonize it. For most beginners learning the ropes of starting a reef tank, dry rock is often the safer, more predictable, and sustainable choice.
How Often Should I Be Doing Water Changes?
In reef keeping, consistency is everything. For a new tank, getting into a routine of changing 10-20% of the water every one to two weeks is a fantastic habit to build. It’s a simple task that accomplishes two critical things: it pulls out accumulating waste like nitrates and phosphates and, just as importantly, it puts back essential trace elements that your corals are constantly using up to grow.
Beyond just the water change, make this part of a weekly checklist:
Test your key water parameters (salinity, alkalinity, calcium, magnesium).
Scrape the aquarium glass to keep that algae film at bay.
Empty and clean your protein skimmer's collection cup.
These small, consistent actions are the secret sauce to long-term stability and preventing big problems down the road.
What Are the Biggest Beginner Mistakes to Avoid?
Even with the best intentions, it's easy to make a misstep. Knowing the common pitfalls can help you sidestep them and keep your new ecosystem safe. The top three mistakes are almost a rite of passage for new reefers, but you can avoid them.
Adding Livestock Too Soon: This is, without a doubt, the number one mistake. You absolutely have to let the nitrogen cycle finish before a single fish or coral goes in. That means your test kits must show zero ammonia and zero nitrite. Be patient—it's worth it.
Stocking Too Quickly: Once the cycle is finally done, the urge to fill the tank is strong. Resist it. Adding too many animals at once will crash your brand-new biological filter, causing a lethal ammonia spike. The rule of thumb is one new inhabitant every one to two weeks, max.
Choosing Incompatible Tank Mates: Not all beautiful fish and corals get along. Before you buy anything, do your homework. Research every animal's temperament, its full adult size, and its specific care needs. A peaceful, thriving tank starts with smart, informed choices at the fish store.
Ready to establish a vibrant, self-sustaining ecosystem in your new aquarium? PodDrop Live Aquarium Nutrition provides the live copepods and phytoplankton essential for seeding your tank with life. Our fresh, lab-cultured pods create a robust food web, control detritus, and feed even the most delicate fish and corals. Start your reef off right by visiting https://www.getpoddrop.com to give your aquarium the living nutrition it needs to thrive.
Comments